Welcome to another wonderful Wednesday here in the Hive, and that means it's time for the HoneyBee Showcase! The HoneyBees are always buzzing with fun, new ideas, and today we are looking at new ways to look at hearts . With Valentine's Day fast approaching, we thought you would enjoy a few great ideas, starting with the box tutorial on Monday, and some great pieces today! Enjoy, and leave us some hunny letting us know what you think!
*****************
 "lucky in love." I suppose this could be a card for both Valentine's Day and St. Patrick's Day...killing two birds with one stone (sorry, bad pun!)


 and the HoneyBees
*****************

Happy Groundhog Day! I sure hope Punxsutawney Phil does not see his shadow :)
Our challenge this week is to use a heart in a clever way. I used one heart as the bird's wing and 3 hearts to create a shamrock. I don't send St. Patrick's Day cards, but I like to make cards that say "lucky to have you" or in this case:
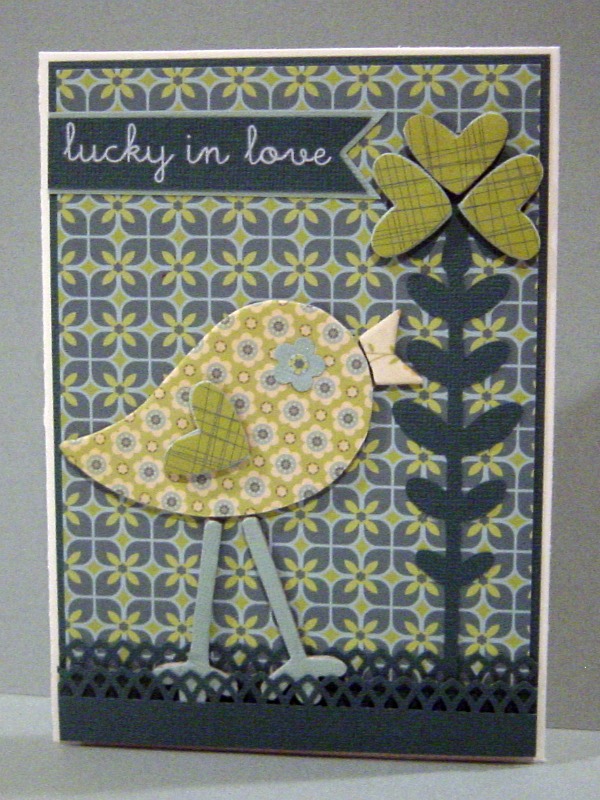 "lucky in love." I suppose this could be a card for both Valentine's Day and St. Patrick's Day...killing two birds with one stone (sorry, bad pun!)
Supplies: Cosmo Cricket Early Bird 6x6 papers, Martha Stewart border punch; Cricut Lite Bloom cartridge; American Crafts rub-on alphabet Kate font; SU So Tweet chipboard,SU flower punch and SU heart punch; Augusta Green and Ponderosa Pine card stock; and foam tape.
*******************

I decided to make this cute little box. I printed it out and hand cut it. The hearts are punched with a Creative Memories punch. The Azalea opens up to show a lovely message in the middle.

Supplies: Azalea Explosion printed box and flower, White CS, Creative Memories Heart punch,
Dimensional Dots.
*******************
For my card, I got my inspiration from the talented Valita. Not sure why, but an upside down heart popped into my mind and a 'tent' was created..lol..I knew it was going to be a circus tent with a banner waving from the top. The 'pole' for the banner is a cocktail toothpick!..Not sure if you can see, but that is an escaped gorilla hiding in the tent..lol..

How will you use a heart in a clever way?
Good afternoon HoneyBees here is either no show Beth or late Beth.......so sorry......anywho here is my contribution for todays post on Hearts.
I made a pocket heart using a template from Denise for a class at Crafters Digital Art Center......if you like digital fun group might want to check it out.
 after cutting out my heart I embossed it using one of the newer cuttlebug folders Kassie than I adhered this white pleated lace around the heart after I changed the color to an old rose.
All my papers are from Stampin-Up made a tag for the pocket using a Victorian sticker to dress it up.
*****************

Our challenge this week is to use hearts in an unusual way. I was inspired by Valita from Australia, and her tutorial on this "Heart Couple"! Valita is a genius with punches and designs. Be sure to check out her blog here. Over the weekend a bunch of us were together for a Cricut Swarm, and following her instructions, I taught how to turn hearts into a tuxedoed gentleman, and his gowned lady! The challenge for the Cricuteers was to follow the tutorial, use the white eyelet card, and the colors red, black and pink! Take a look at what these amazing designers created!
Now it's your turn! What unusual and creative way can you use a heart? Come back and leave a post so we can check out your card, layout, altered item, or other creative project!!


 |
| Betty Brett |
Our challenge this week is to use hearts in an unusual way. I was inspired by Valita from Australia, and her tutorial on this "Heart Couple"! Valita is a genius with punches and designs. Be sure to check out her blog here. Over the weekend a bunch of us were together for a Cricut Swarm, and following her instructions, I taught how to turn hearts into a tuxedoed gentleman, and his gowned lady! The challenge for the Cricuteers was to follow the tutorial, use the white eyelet card, and the colors red, black and pink! Take a look at what these amazing designers created!
 |
| Claire Walz |
 |
| Susan Diller |
 |
| Linda DuKor |
 |
| Sandy Pennington |
 |
| Olga Bales (Age 98!) |
 |
| Kristi Driscoll |
 |
| Betty Klebau |
 |
| Carol-Lee Porter |
 |
| Judy Ford |
Now it's your turn! What unusual and creative way can you use a heart? Come back and leave a post so we can check out your card, layout, altered item, or other creative project!!
*********
Beth Ullman
Good afternoon HoneyBees here is either no show Beth or late Beth.......so sorry......anywho here is my contribution for todays post on Hearts.
I made a pocket heart using a template from Denise for a class at Crafters Digital Art Center......if you like digital fun group might want to check it out.

All my papers are from Stampin-Up made a tag for the pocket using a Victorian sticker to dress it up.
 and the HoneyBees