Showing posts with label Gift Items. Show all posts

Monday, July 11, 2011

Monday Motivational ~ Heavy Metal!

Welcome to our Monday Motivational tutorial.  Sorry it is posting a bit late.  I am out of town, and posting from a remote location.  I am excited to bring you a fun project that is easy, versatile, and useful.  I want to thank Monica Weaver from Add A Little Dazzle for her inspiration.
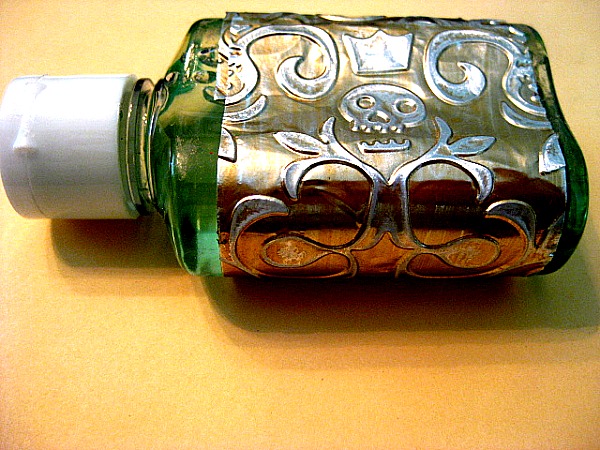
My project is metal covered hand sanitizers!  These are embossed and specially colored. Imagine what themes you could fix these for!!  Watch for the one in the last photo :) Bwahahahah!!

Betty Brett

Start with small hand sanitizers.  I got mine from the dollar store, three in a box.  The metal tape I used is called Aluminum or Flashing Tape (and it's the same I used for my red, white and blue insulated cup video a couple of weeks ago).  It comes from your local home improvement store in a nice BIG roll for about $8.00.
Now, here's the part I learned the REALLY hard way!  The only coloring medium that works on this project is a paint!  Wanna know how I know???  I've tried everything else :)  How does a Copics instructor FORGET that hand sanitizer is a solvent for Copics?  They color this tape beautifully, BUT when you use hand sanitizer, it takes the color off, and onto your hands!  (Same with any alcohol based marker!)  The same would happen with any water based ink... therefore, after lots of experimentation, I have discovered that Elmer's paint markers work very well for this project! They come in lots of plain and pearlized colors.
After coloring the tape, place it in your favorite embossing folder, and run through the embossing machine.
Then use a sanding block to remove the color from the raised image!  The silver really pops!! This is fast and easy.
I remove the labels from the bottles, then peel the backing from the tape, revealing the very sticky adhesive.

 Carefully wrap around the bottle, and you have a great project!  This one would make a great gift for a guy,
or "potion" at Halloween!!
 
I hope you will be making something from metal tape, a soda can, metal sheets, or some other "Heavy Metal" with us this week!
 
Happy creating ~
 
Photobucket

Friday, November 5, 2010

Buzz, Brag, and Bee Happy Fridays!

It's Friday, and our first ever Buzz, Brag and Bee Happy Day! This is where we get the chance to share a "bit o' honey!" (good news), things we have created, or whatever is making us buzzing with happiness! And we are asking you to join in!! What good news would you like to share? This is how we get to know each other! We do hope you will join in the fun!
.............................................


Sharing My Son's Wedding!
I am so excited to share with you a few highlights from this gorgeous wedding on October 31, 2010. Included in my photos will be a few things Elizabeth wanted to surprise me with. Yes, she was good at keeping things a secret even from me. First things first. A photo of my handsome son, Joe and beautiful daughter-in-law, Elizabeth.


Here are a few surprises Elizabeth had for her guests and me.


Elizabeth made this fun tag giving each table a name. The parents' table was called 'Mummy'...lol

Elizabeth made the tags for this cute pumpkin, with a tea light inside, for each guest to take home.

Is this a cool cake or what!! Joey and Elizabeth gave the wedding planner a napkin that was to be used for cocktails as an inspiration for the cake. Though they picked out the flavors and cake design, they didn't know what the finished product would look like. Needless to say, it was a big hit!! If you look at Sunday's post, you will see a close up of the super fun wedding topper!


Check out those stocking and gloves! Not only was this a surprise for the guests, but for Joey too!

Yep, Joey had a surprise too. These are the socks he wore with his tux..lol..
Gotta love these kids!!!
...........................................................
It's me, BettyBee, and I am happy to share a fun little card I was privileged to do for Digital Delights new release yesterday. Wendy does such cute images, and she really goes all out for Christmas! I'm also excited because I am teaching my brand new Cricut Expressions class tomorrow, and I have some fun projects prepared for the students, so they will put their Bugs through the paces! This is the second in the Cricut series that I have written. Fun!

It's your turn! What "bit of honey" would you like to share? Photos can be linked to the LINKZ below, and typed replies are in the comment post! Don't forget that we are going to have our great FALL BLOG CANDY give away on November 15th, and all you need to do is leave comments, telling us that you are interested! If you are a follower, we will put your name in the drawing again! We are so happy to see new followers arriving every day! Please keep coming!!!

Hugzzzzz and Happy creating to all ~


Sunday, October 31, 2010

Halloween Wedding for Rosemary's Son!

Yes, the long awaited day has come! Elizabeth and Joey are getting married today!!
Congratulations to Rosemary and Joe, too... the very proud parents. All of the HoneyBees are very happy for everyone :)
Roe and Elizabether were kind enough to share with us some of the spook-tacular things they have been making for this wedding.... though Elizabeth held some back to share with us next week, so she could hold that "WOW" factor even for Roe!
May their most unusual, and charming wedding always lead toward "Happily Ever After"!
~~~~~ ^ _ ^ ~~~~~
Hi and HAPPY HALLOWEEN!! I wanted to share with you a little of what is happening today! My son Joey is getting married!!! Now we know how fun Halloween is, but having a wedding today is going to be super fun. Elizabeth, my soon to be daughter-in-law, wanted a formal wedding with just a touch of Halloween thrown in. My son, who loves horror movies and the macabre, found the perfect mate who was just as thrilled to make this the day of their wedding!

I was excited when Elizabeth asked me to help with some of those touches that brings this wedding a little on the outside of norm.

First was 'Save The Date'. Putting their photo on a post card, and using the right fonts, set the theme in motion. Sorry, I don't remember the fonts that were used. Elizabeth added ribbon, flower and button and mailed these in clear A2 envelopes.


Next came the invitations! Using black Core'dinations with a terra cotta color background, Elizabeth had a clear vision of what she wanted to send out. A Martha Steward ribbon punch was used as a slider; (too bad the spiderweb wasn't out in the stores at the time this was done); I still love how the invite looks! The photo mat was cut using A Child's Year, and the spiderweb from Paper Doll Dress Up, with the Cricut. The RSVP card was hand stamped.


Elizabeth was so clever to come up with this idea for the seating chart...Black branches with tombstones hanging down!! Once the table has been assigned, she will then put the table number with the name.


Here are some fun 'candy' bags the guests will receive.


She has done more, but wants me to be surprised. I know haystacks and pumpkins will be used, and the flower girls will carry fall baskets with real leaves. Yes, this is an outside wedding and it's going to be beautiful!

I was able to get a photo of the cake topper. Now, you have to understand this IS Halloween and this is something that shows the kind of humor Joey and Elizabeth are incorporating into their wedding.
~~~~~ ^ _ ^ ~~~~~
And the Mother of the Groom will be dancing with her son to the hauntingly beautiful Lullaby from 'Rosemary's Baby'! Now, isn't that sweet?!!! But, of course!
All the best to the happy couple! You can leave them a message of love and cheer here in the comment section! (And be sure to come back next week to see what other surprises Elizabeth has up her sleeve (or will it be under her hat???) Who knows?
We hope you have enjoyed our EEK WEEK presentations, and invite you to be here on Monday morning for our first regular TUTORIAL!! We'll be ready to introduce our new line up, and let you know how our weeks will be going,,,, plus the blog candy we've been promising is here, and ready for you!! And, I've seen our new blog design (draft) and I'm loving it! I don't know if it'll be quite ready for the unveiling on Monday, but VERY soon!
Happy Halloween! Have a safe and fun Trick-or-Treat :)
Happy creating ~
BettyBee and the HoneyBees!

Tuesday, October 26, 2010

Tomb it may concern...

BOO! So glad to welcome you back to Day 2 of our EEK WEEK!!
The HoneyBees and I are having a lot of fun sharing our Halloween decorations, gift ideas, projects, and some 'WEB'sites with you this week.
~~~~~ ^ _ ^ ~~~~~


This hive is alive and buzzing with excitement! This is HoneyBee June Houck welcoming you to celebrate EEK WEEK with us here at Betty Bee's Buzz.


Halloween is practically upon us and I have many teacher gifts to make. I love to create, but I don't always have time to design my own projects.
I made each of these gift boxes and card from a BoBunny project kit called "Whoo-ligans." I enjoyed the thrill of creating a home-made gift without all the thinking and planning :)
All I needed was a Hershey's Kit Kat bar (and other candies), my trusty score board, and adhesive. I did add some doodles with a black marker, and extra distressing with a white ink pad and a black ink pad.

I really like these adorable projects and I want to create some similar on my own. I hope you are equally inspired!


~~~~~ ^ _ ^ ~~~~~
Here you'll find I'm totally BATTY for this simple banner!

The bat is hand cut, and the wings are scored from a center point on the top, down to the two peaks on the bottom. These folded forward make a nicely dimensional wing. The center of the body is folded from the wing edge to the bottom of the center peak, so there is a "mountain fold" there. This helps with the dimension and also with the placement of the honeycomb piece.

The eyes are red gems. The honeycomb piece is made with six 2" circles, each folded in half and stacked (glued) on top of each other, like orange sections. When fanned out, the first and last pieces are flat, and they are then glued to each side of the center crease on the bat's tummy.

These banner letters are cut with the Cricut using the George cartridge. The purple "squares" are 3" and the orange shadow is cut at 3" with the shadow feature button pushed. The letters are cut at 2 1/2 " in black, and 2 1/2" Shadow in green. The little Ghost is from the Paper Doll Dress Up Cartridge.

This is a very simple, and adaptable design. It could say JOY for Christmas, with a Sleigh or any other appropriate symbol replacing the bat. It could have a basket at the top, and HOP spelled out for Easter. How about a big Sun, and FUN spelled out for summer? I have also used this simple concept, and used much more elegant papers, and more complicated cuts to create a beautiful Welcome Plaque for my home. It spells out BRETT down the ribbon, and has Est. 1973 at the bottom. (I'll have to give you an IOU for a photo on that one :)

We'll be back tomorrow with more Halloween inspiration and fun things to share! I hope to have the LINKZ thing working by then! Are you getting your ideas ready to share with us? I hope so! We're getting our blog candy ready for you!

Happy creating ~
BettyBee and the HoneyBees