Showing posts with label Copics. Show all posts

Wednesday, July 27, 2011

HoneyBee Showscase ~ Christmas in July


Happy Wednesday!  It's HoneyBee Showcase day, and it's Christmas in July!!  Are you ready for some cooler breezes to blow your way?  Perhaps a fresh idea or two to spark your imagination will be fun, too.  We have some cool ideas for you this week, and hope you will be joining right in with us.
******************
Hello, Welcome to HoneyBee Showcase.  Wow! Didn't HoneyBee Judy do a great job on Monday!!!!  I've really had lots of fun with Christmas In July!  This week I made this adorable little Pyramage Penguin.  I just love working with Pyramage.  It gives it such new dimensions.  You can find it over on Digital Delights.  The next card is one I did last Christmas.  I just wanted to share it with you.  It's one of my Fav's


Have a wonderful week!  Huggles


*************************


 It's so nice to post this week... it seems like it has been forever since I have shared here at the hive........Sorry HoneyBees but I think my mojo had flown south for the summer and my grandkids helped me find it today! We have been in my craft room all day creating.
I followed Judy's lead with the snowflake.  Wonderful tut, Judy, and I made mine using the Stampin' Up small and large tag punch and a tutorial from the Technique Junkies newsletter.......the sweet little image is one of Linnie's at Whoopsi Daisy Designs ... love love love snow people.
Now we want to see your Christmas in July....your turn.

*************************


Happy Wednesday!! With the weather in the upper 90s, I guess doing Christmas cards should cool one down a bit..lol..Truth is, living in Florida we can have temps in the 90s even in December. Oh yeah, it's happened and if not, it sure feels like it..lol..

I would like to thank Betty for giving me some really cute Loralie Design fabric that just happen to be Christmas designs! I added a little Stickles to make her 'Christmas Glittery'..!!

                                                       ************************
Sometimes it is said that "necessity is the mother of invention"...
Well, most of you know that I am traveling, and don't have much with me in the way of supplies,
so this shows that even with NO Christmas supplies at all, you can pull off a CAS card :)

I do have my Gypsy with me, so I have cut out a layered ornament from some aluminum foil glued to a piece of cardstock.  The Cuttlebug embossing folder might not be the one I would choose if I were at home, but the idea is there.  The red part of the ornament is colored with a red Copic marker, and there is some sparkly Stickles for bling, and the center is a great silver dome... I wish it showed up as pretty in the photo as it is in person.  Add a strip of silver and red stamped sentiment, and a bit of red cording,,, and it carries a cheerful  Holiday message.

Now it's our turn to be dazzled by your designs!  Link up your cards, layouts, projects and posts below!  We also have an email address if you want to send us info, and we will post for you.  We love hearing from you!!

Happy creating!


Photobucketand the HoneyBees
 

Monday, July 4, 2011

Wave the Flag!!! Monday Motivational July 4, 2011

Welcome to our Monday Motivational, and we hope you had a great weekend!  Many are still celebrating today, and are looking forward to a lot of fireworks tonight! 

Our feature today is by HoneyBee Judy, as she shares a very patriotic Red, White and Blue card, and layers on lots of textures.  Show us your COLORS!

Welcome to Betty Bee's Buzz! Happy Fourth of July!This week's Monday Motivational is about our Flag.
Judy Ford
Use a Flag, Banner or Bunting on your project and link it up with us!
it's also a color challenge so show off your best RED, WHITE AND BLUE!!!

For my card I started with my House Mouse Stamp that I colored with my
 Copic markers!!!
I took a great class on copic markers from Betty Brett!!! She showed me how to do shading and perspective and look around me at all the colors and how light plays off different items!!   She rocks!
               I used my SU Keynote Die and then my Cuttlebug Divine Swirls Embossing Folder.
I think it looks like the wind is really swirling by the flag.
Then I used a MS Edge Punch on 4 different patriotic papers for the background!!
This card uses lots of layers, but it goes together quickly and with a lot of pride!!!
Inside is the following computer generated phrase
"The American flag does not fly because the wind moves past it.  The American flag flies from the last breath of each military memberwho has died protecting it.American soldiers don't fight because they hate what is in front of them.  They fight because they love what's behind them!"
Support our Troops!
God Bless the USA!!!
Now it's your turn! Wave the Flag, and/or pick Red, White, and Blue, and show us your project by linking up at Betty Bee's Buzz on Wednesday!
                                                                      ***************


Photobucket

Monday, June 20, 2011

Monday Motivational ~ Food Glorious Food!


Welcome to the hive for our Monday Motivational!  I must admit that I rarely feel like there are coincidences... Just wonderful things that are meant to be!  Well, it has been many weeks since we decided that our theme for this week would be "Food, Glorious Food"... it's been a song from long ago that sticks in my head, ever since my kids and I did a church "Road Show" with this theme, and you know how music has such an impact on your life... especially happy times! 
Now the fun part for today... I was doing some research, and find that our friends at Splitcoast Stampers had a great Virtual Scrapbook Night this weekend all about food, too!  Plus, I just signed up for a recipe swap over at Paper Phenomenon, which is happening next week!  Food is everywhere! It IS glorious!


BettyBrett
This weekend I made the most yummy cupcakes, and I wanted to share the recipe, plus a little tutorial with you.  These are CUPCAKES WITH A KISS!    My daughter, Tori is the undisputed Cupcake Queen, and she shared this quick and easy addition that made a mouth-watering delight!  Let's cook up some fun!

First, you will need a regular cake mix, of your choice of flavors, and the ingredients to prepare it according to the normal directions.  You will also need one Hershey's Kiss for each cupcake.  I happened to have a wonderful assortment of flavors on hand, and that made for a delightful smorgasbord of choices!  Unwrap the Kisses, and place the little paper "flag" inside the cupcake liner so it sticks out the top.  Fill 2/3 with batter, then gently press in one Kiss, and bake as usual.  No need to add additional time.  The Kiss will sink in and give a super surprise center!  Let cool and frost.

For my recipe card above, you will see that I did the recipe on my computer, and used Crafty Secrets adorable recipe birds stamps.  They were stamped with Memento Ink, Tuxedo Black for the two at the top, and London Fog for the one over the lettering, creating the illusion of it being in the background, and not obscuring the typing.  All images were colored with Copic markers. 

Create a cupcake topper with two punches, sandwiching a toothpick in the middle, using foam dimensionals.  Can you see the Kisses flag here?  This is a plain Kiss... the Dark Chocolate say "Dark", the Almond say "Almond", etc.  There are LOTS of different flavors... I had 7 different kinds today!

Here is my cupcake dessert stand for Father's Day, featuring the Necktie downloads from Shindig Parties To Go that we Buzzed about last Friday!  Didn't they turn out SO CUTE?! 

Wednesday the HoneyBees will be ready to share all sorts of Food, Glorious Food with you, and we hope you will be thinking of what you will want to create to share, too! 

Until then....
Happy creating!

Photobucket

Wednesday, June 1, 2011

Honey Bee Showcase - Corrugated Cardboard

Happy Wednesday, and here it is June 1st already!!  The year is half over, and school is ending... it's the beginning of hurricane season here in Florida, and summer vacations are beginning... What is happening in your part of the garden?

Based on June's great Motivations on Monday the HoneyBees have created some awesome projects with Corrugated Cardboard, or Crimped Papers this week.... Let's have a look!
**************
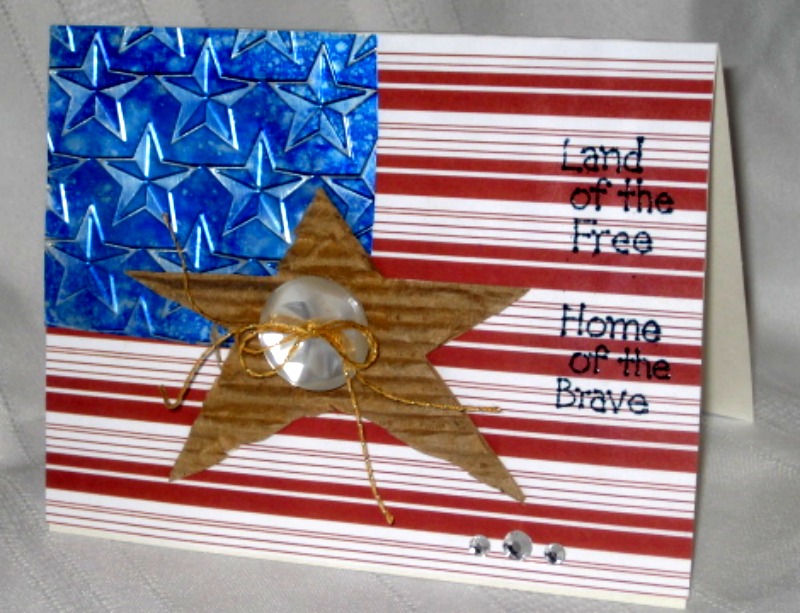
In keeping with the tender feelings of honoring our military heroes this week, I have chosen a red, white and blue theme.  The upper star field is made from a Diet Coke can, tinted with Copics, then embossed with the Cuttlebug.  My star was cut by hand, and embellished with an awesome button and gold metallic crochet cotton.  My sentiments are heat embossed, and I've finished up with three sparkly gems.
God Bless the USA!

Betty Brett
********************************


HoneyBee Courtney Lee reporting for corrugated goodness! 

Today we are showing you how you can use corrugated chipboard on your projects! 

My friend June provided you with a host of inspiration on Monday and I knew when I saw her cards exactly what I want to do! 

I think this is my first "legal" sized card - 9"x4"


I am a *proud* member of the Cricut Circle and we had a challenge to case a card in the private magazine that is provided for us! I have never cased a card to this extent and thought it was just charming so I chose this one. 

I took a screen shot of this card to share with you so you could see how closely I cased it. In the magazine, we get cut sizes, recipes, and instructions so it was easy to follow closely.

This is the card I cased by Janet Wilkins
Recipe:

******************
Every Monday at Betty Bee's Buzz is Monday Motivational. This week Honey Bee June did a great tutorial on corregated cardboard. Judy Ford
I've never worked with corrugated cardboard before now. I took Queen Betty's suggestion and ripped the top off a box... great therapy!!!  Then I took June's suggestion that it can be cut with Szzix die cuts easier than with the Cricut Expression.
I have 2 Sizzix die cuts and 1 SU die cut in my arsenal. Here are the cards I made.
Sizzix christmas tree #2Sizzix Frame with Scallops


Sizzix Frame with Scallops (inside frame piece)
Waste not want not....
SU Lattice Frame
I used 4 different patterned papers here...I thought it would look like a stained glass window


Now you try it!!! Go rip apart an old box and get started!
Link up with us here at Betty Bee's Buzz

********************

This was such a great challenge for me because I dusted off my Fiskars crimper; a tool I haven't used in a long time!!  Using my Mother's Day Bouquet cartridge, I cut scallop circles and then ran them through the crimper.  For the pot (bowl), I used a Sizzix die, crimped and then used my brown Copic, brown chalk and brown ink for added dimension.  Sizzix die for the leaves, Stickles, Prima flowers, Cuttlebug embossing folder for the card and Imaginisce I-top for the center in this popped flower.

                                                                 **********************
 

I used a piece of Cardboard box for my corrugated paper.  I'm in the process of moving my craft room.. (uggg what a mess).  So I couldn't find my handy dandy crimper...  But not to despair -  look how cool it turned out.  I used paper from my monthly craft kit.  The digi is one I've had for a while and I apologize, as I'm not sure who's it is..

***********************

Now it's your turn!!  Let's see you go rip up those boxes, or crimp your chipboard, and show us what your style!  Post your project to the link below, or send it to us in our email, and we'll be checking you out!

We are on the lookout for Guest Designers!  Would that be YOU??? 

Winners from Summertime Challenge will be announced on Friday's Buzz, Brag and  Bee Happy!!! 
Stay Tuned!


Photobucket


and the HoneyBees


Wednesday, May 11, 2011

Honeybee showcase ~ Altered Photographs

Welcome to the HoneyBee Showcase for this Wednesday!  It's Altered Photograph week here in the hive, and we have some sweet projects to share with you!  We started out on Monday with Rosemary's tutorial on how to use imaging software programs to alter your photos before you print them... Now we have some that are altered after the fact!  Let your creativity be inspired to fly!!!
                                                       ***********************
This is my take on the Monday Motivational tutorial at Betty Bee's Buzz by our Honeybee Rosemary on altered photograph. I used my parent's wedding picture to make a page for a 75th wedding anniversary album. I used my printer to print out 4 copies of the picture. My Copic markers colored Mom's bouquet. I then cut out each of 3 copies of the picture - one with Mom and Dad, one with Mom, one with the colored bouquet. I seperated each with a 3D dot. The sheet music was made from an online source and the embossed paper is from Tuesday Morning. The lace is from my stash.


Thanks, Rosemary, for the great motivation! Lots of great ideas to keep trying this again


on some other old photos, too! Let's see what you can do now!!!Judy Ford

*******************


I made a LO with my altered photo.  (The altered photo is the top picture).  My children love this little concrete bench under an elm tree in my parents' yard.  We can rarely get a good picture of either of them, but on this particular day we took several photos and one was cute of J and another was good of K.  DH & I combined the two photos!  The tree and bench are not quite right if you look really, really close, but for the purposes of my LO, it worked perfectly :)


June Houck
 
 
*****************

Look who's early this week me, me, me, me!.......love this technique, Rosemary! Thank you so much for the inspiration.  I used my Copics on my picture and did they ever work like a dream!  This is my grandson, Lucien, taken this past week-end at a Heritage Festival


I colored in the cute little bunny that he is so gently holding.......isn't that sweet?  Here is the scrapbook page I did with this image.
Lucien saw so many cool things on Saturday that I am making him his own 8x8 album, (Thought I would use this page as the cover) so he can share it with his daddy, who was not able to go because he had to work.
Hope you join in and share your photo's with us.  We would love to see them.
                                                             ************************


 I followed Rosemary's suggestion, but since I am still at the hospital with DH, I did a quick and easy version with a printout of a cropped photo of my granddaughter, and added  wonderfully blended colors with Copic markers.  There is a tiny bit of color to her lips, and I did her eyes blue, but it doesn't show up... anyone have an answer to this?  I tried all of the colors in my arsenal, and went back and made the white reflections white again.  Thanks to my sweet daughter for the beautiful velvet Mother's day card that serves as the mat for my card!  (Not bad for creating under adverse circumstances!!)

Betty Brett
                                                                     ******************
It's YOUR turn!  Show us your altered photo projects!!  You can use digital alterations, or you can alter the print using ink, paint, or your choice of other medium.  We'd love to visit your blog, and find out what creative ideas YOU have!  You can link below, and everyone can come and visit,  or you can send us an email at BettyBeesBuzz at hotmail.com  
Photobucket
and the HoneyBees

Wednesday, March 23, 2011

HoneyBee Showcase - Twine it up! March 23rd

Welcome to the hive!  We are all twisted up in twine this week!  Aren't you loving seeing twine all over the place?  It is so versatile and easy to use!  Court gave a great tutorial on Monday, sharing a number of fun ideas and tips.  Here is what a few of the HoneyBees have done, too!
*****
I am so thankful for Court's video on how to do a spiral twist like she did on the button!  Here I have used the same technique on the sun, and it was really easy to do!  I have two cards to share with you today. The one above is nice to have on hand for someone who needs cheering up.  The little bunnies playing in the trees are from the Cricut "Give a Hoot" cartridge.  I hand wrote the sentiment.

This Tilda card is going out to a very special "Cupcake Designer" who is having a birthday next week!!!  I know she will see this before she gets it in the mail, but she won't know what is coming inside of it :)  Happy Birthday, Tori!  The embossing folder is from Sizzix, and the coloring is with Copics.  The round sentiment is from Stampin' Up!. 

On both of my cards I used gold flecked embroidery twine (or string) that comes on a short round tube. 

*************


June Houck
Our challenge for you this week at Betty Bee's Buzz is to use twine on your card. I used mine to hold my pennants, but I cut my pennants so large, you can only see my ties. Yikes. The cute birthday girl and sentiment are a MFT Pure Innocence stamp set. I colored with Copics and layered Bella Blvd "Sweet Celebration" papers on a yellow-orange Bazzill card stock and SU whisper white card stock. The shape is a Spellbinders die and the border punch is by Martha Stewart. The glittery card base is by DCWV and the red gems are from Michael's. I popped my girl up on dimensionals. So cute!

                                                                     *********

Now it's your turn!  Show us your twine projects, and you could be the winner of this week's prize of a BRAND NEW BettyBee Design Heritage Page Kit!!!  Watch for the introduction of these, and other,  exciting new products coming soon!  You could be the first to have one!!  Just link below, or send to our email address, and we will link for you!


Happy creating!


Photobucket


and the HoneyBees