Showing posts with label Thank You. Show all posts

Friday, June 10, 2011

Buzz, Brag & Bee Happy - June 10, 2011

Happy Friday!  Welcome to the HoneyBee hive... and the kickoff to a great weekend!  This is the post where we share the BUZZ in the BIZZ, BRAG about what's been happening, and share what is making us HAPPY... and we invite all of you to do join right in with us! 
                                                       *************************
First, it's sweet HoneyBee HAPPY BIRTHDAY wishes to HoneyBee Court
Here is the card I made for her, (though it probably hasn't made it all the way across the country yet)...
It is made with DCWV's new Lemon Flower stack, and Court's favorite color is olive green!
She shares her birthday with grandson Porter, and he is having a high flying birthday today, so here is his card celebrating his third birthday!

And, I wanted to give credit to one of our bloggie buddies out there who has a wonderful demo on how to stitch on cards, similar to my wording.... but for the life of me, I can't find it!  She stitched the word "Happy" in green,  and showed how to choose the best font from your computer as a template.  Somebody help me out here, and help me find the tutorial again!  Thanks!! 

EDITED:  Thanks everyone!  The most talented Lauren Bergold, from "All the GOOD Blog Names Were Taken" is the artist that did this great tutorial!  Please head over and check it out... you will not be disapppointed!

Betty Brett

                                                                     *************


My daughters' birthday was earlier this week, so I needed to make a quick set of thank you notes for the presents they received. I enjoy the CAS style, and I found a this terrific sketch at Die Cuttin' Divas:


(Card supply details on my blog.)


I hope your weekend is bee-utiful!
                                                                ******************
Honey Bee Judy Ford here:

Great report at the Doctor's office. He is very pleased with my progress and I don't need to go back for 2 months! Yippee! Weight restrictions raised to 25 pounds!
Can go back to aqua-aerobics next week! Going to visit my daughter in PA this weekend!
I found this great tutorial on Community.provocraft.com for roses with your cricut!
Haven't tried it yet but sure looks do-able.
Have a great week! What's going on in your hive???
                                                          ********************


Now it's your turn!  We love getting comments from you, and we know Blogger is being kind of stubborn lately, so if you want to, send us your comments to our email at BettyBeesBuzz@hotmail.com and we will post it for you!    Also, we invite you to share important things in the links below... what is the BUZZ in your BIZZ?  Share the scoop!!  What do you want to brag about?  What is making your hive happy this week?  Is there someone that deserves a pat on the back?  Let's cheer loud and clear!

Have a great weekend, and we'll be back on Monday with more great Motivation!
Photobucket
and the HoneyBees


Monday, April 25, 2011

Monday Motivational, Iris Folding


Good morning, and welcome to Monday Motivational here in the Hive!  We hope you had a wonderful weekend, and enjoyed your Easter! 
 
I'm Betty Brett, better known around here as BettyBee, and it is my pleasure today to share today's inspiration with you.   We have all been a-buzz about IRIS FOLDING, and our HoneyBee Wanda was going to be sharing this with you, as she is our resident expert...
however, she's a bit under the weather at the moment, so your Queen Bee is going to do the honors!
 
BUT FIRST...
I want to show you what was in our Easter Basket!!

Betty Brett

 Our newest granddaughter, Erin Amanda, was born on Thursday, and here she is!  Just add bunny ears, and the Just Hatched outfit, that I made with the Freezer Paper technique, that we showcased a couple of weeks ago!  How cute is this???
And, is there anything more precious than this???  Her little bloomers were exactly the same colors as some of the eggs...  Thanks, Easter Bunny!!! 
**************
Now, on with your regularly scheduled programming!

This is IRIS FOLDING!  It is a very old technique, that originated in Holland, and is called this, because the opening in the center represents the IRIS of a camera, or the eye.  There are a few basic folding shapes, and myriads of cut aperture (opening) shapes to lay over the top.  It is a very easy craft to follow, and the results are quite fun.

First, start with a pattern.  This one is a PENTAGON pattern, which means it has FIVE SIDES, and will typically require five different color papers to get the desired results.  I got this pattern from a FREE WEBSITE that I GOOGLED... called HandcraftedGreetings  They offer several different patterns, all in PDF format, and are very easy to download.  There are a number of other sites out there with free patterns, so this is a budget friendly class!!

These are my five pieces of patterned paper that I chose for my project.  Paper is important in this craft.  It should be more lightweight than heavy, because you will be folding it in half, creating an finished edge, so there will be a fair amount of bulk, and heavier papers don't work well.  Wrapping paper, magazine pages, origami, and thinner designer papers are perfect.  Ribbon can also be used, but it doesn't have to be folded.

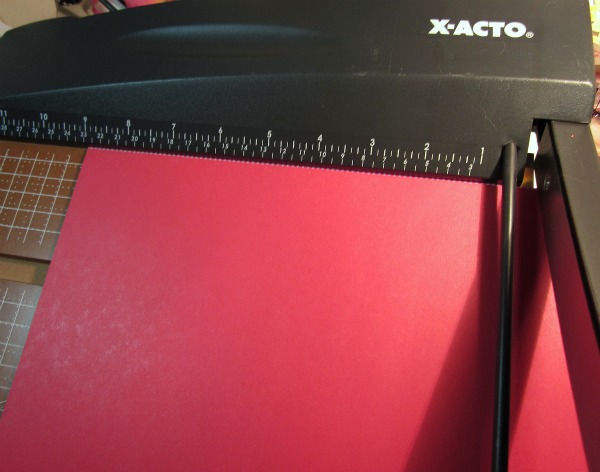
The next step is to cut one inch wide strips of your papers.  I have a very nice X-Acto guillotine cutter, so I was able to cut all 5 sheets at once.  But, if you only have a paper trimmer, that will also work very easily.  Using 12 x 12 paper, I cut three strips of each color, and had PLENTY left over!  LOL Just use whatever you have.  This is a great project for scraps!

This is my own handy dandy little trick.... since these strips all need to be folded in half, I pulled out my trusty Martha scoring board, and quickly gave a little stack of strips a scoring line right down the middle!  That made folding these little strips of paper a snap!   Now, I will mention here that I've only done this craft once before, and that time we were given instructions to make so many strips X inches long, and so many Y inches long, and so many Z inches long, and.... and.... and.... Well, you get it!  This time I just left my strips the full 12 inch length, and trimmed them each time I placed a paper exactly where I wanted it.  Worked like a charm, and no wasted paper!   
 
Here are my beautiful folded strips, all laid out in color specific order... this is important... don't get your colors mixed up!  You will be putting them down in order, so just keep them in order, and it will go very smoothly!

For my opening, I decided to do a five petal flower.  I chose one from George, a Cricut Cartridge, and cut it at 3 1/2 inches.  It isn't exactly symmetrical, but it will work nicely.   You can cut your opening with any die cutting machine, embossing machine, or by hand.

Here is the flower laid over the IRIS FOLDING template, and gently taped into place (with removable tape), so it won't slip. Don't worry if your pattern isn't the EXACT size.. your papers will cover the opening, and it will be fine.  If the opening is a little bit larger than the pattern, like mine was in two small places, I just added two additional strips, and it was perfect!

Here we go!  Just simply tape a strip of color number 1 on top of the place where pattern number 1 is.  Trim and tape into place.  Move on to color number 2.  Lay in place, trim and tape.  Keep following the numbers in order. 

Here we are finished with the first round.  It was easy!  Just like Paint By Number!

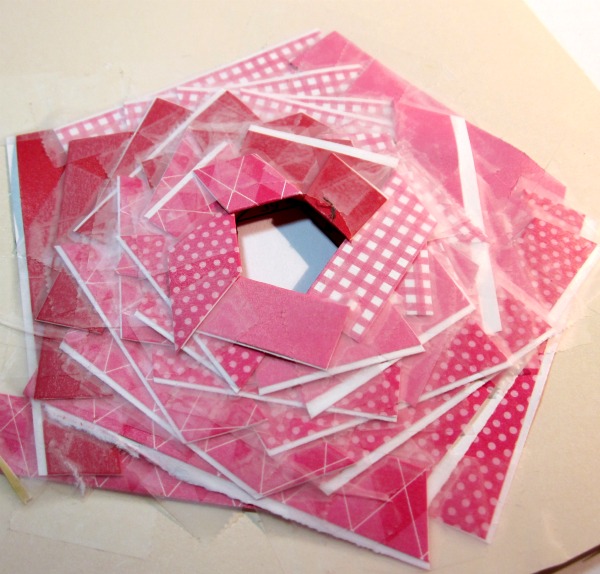
So, here we are all finished!  OK, so it's not all that pretty on the back, and there's a bunch of tape there, BUT it went pretty fast, and now you're excited to flip it over and see how it looks!
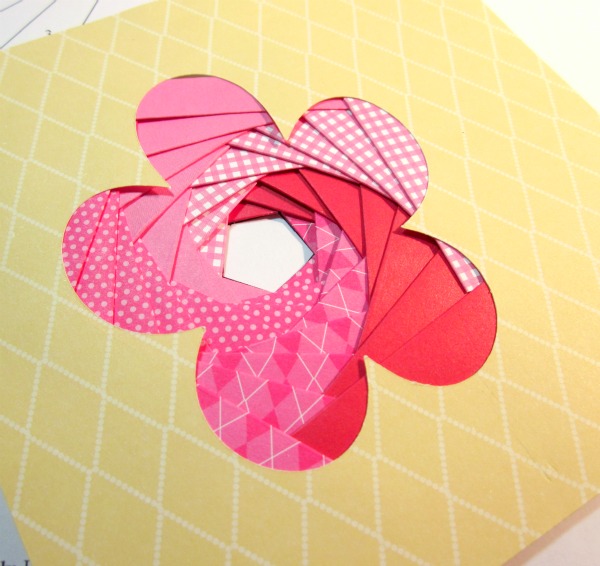
VOILA'!!!  Isn't that neat!  And look at the IRIS in the center!  This is the PENTAGON pattern, and the five sided shape is very evident!  Now it's time to finish the center.

I opted to repeat the yellow paper that I had used on the outside of the card, and then added a gorgeous pink gem to reflect the pinks in the papers. 
Here is my finished card.  It is a special "thank you" for a friend who gave me a great big pad of scrapbook paper... and these came out of it!   Adhering the card front to the card base with dimensionals is helpful in compensating for the bulk of the paper and tape.  It doesn't look thick or awkward at all.
I do hope you have enjoyed the tutorial, and will give it a try!  Come back on Wednesday and see what the HoneyBees have created, and that is where you will find the link to post your IRIS FOLDING projects! I will try to get a ribbon project done for you by then.... want to see one??? 

Happy creating ~


Photobucket