Happy Valentine's Day from the HoneyBees!! Today I have a sweet treat basket tutorial that you can make for lots of treat occasions!!! And it's so easy you can whip up a bunch of 'em before the kids get home from school today! (Or your hunny gets home from work!!!) Maybe the kids would like to drop off some goodies to a neighbor.... I'll bet you can find lots of really fun ways to use this neat treat basket! I hope you will leave me a comment telling me your ideas ♥
The first step is to start with a piece of cardstock that is square, and divisible by three... I used a full sized 12 x 12, but you could use 9x9, 6x6, or even 3x3... or any other measurement, if you do the math :o) You will score the paper evenly into nine even sections.... I scored at 4" and 8" and rotated the paper, and scored at 4" and 8" again. (If you were using 9x9 you would score at 3" and 6", get it?) Very easy!
Next, you make four cuts... on the side panels as shown. Then fold all the score lines. Now it's time to fold up the sides of the basket. It will not fold all the way up like a box... the sides will flare out.
Fold the center section to the inside, and bring the two ends toward the center until they are even, as shown, and secure. I decided a staple would work nicely, because I was going to cover it with a stamped image. If you are not going to cover it, strong double sided tape will be necessary. Rounding these top corners would be attractive, too!
Next comes the handle. I added a 12x 2 1/2 " handle, decorated with a Martha Stewart punch and designer paper. The handle tucked down inside the inner wall of the basket, and another staple held it securely. Strong adhesive or brads would also work well.
Now I added a decorative medallion to cover the folded edge, and give my message. This was made with Nestabilities, and stamps from JustRite Stampers. It is secured with dimensional foam dots. Add a lucious bow.
Fill with sparkling grass and your favorite chocolates, and you have a very sweet treat!
I hope you have enjoyed today's Monday Motivational, and will be back with us on Wednesday to see the Sweet Treats the rest of the HoneyBees will be sharing. Thanks for coming to spend time with us here at the Hive... you mean a lot to us!
Happy Valentine's Day... and have a great week!! and the HoneyBees
Welcome to Buzz, Brag and Bee Happy Friday! This is the day where the HoneyBees share whatever is happening on their blogs, in their lives, and whatever they are excited about, and we invite you to join with us, and share your good news, too
I had a great time "Tying One On" with ribbon this week, and the mini album above is featuring a braided frame around the oval medallion. I was inspired for this by our friend, Bonnie McLain, over at her Love, Light and Peace Blog. I could have linked you directly to her gorgeous braid on Feb. 3rd, but want to be sure you have the chance to see some of her other amazing work, too!
I thought I'd share a flashback Valentine today, along with a very cheesy Valentine poem... just in case you are looking for something for the inside of your card...
Roses are red
Violets are blue~
I'm so happy
That I have you!
Roses are orange
Their leaves are green~
You make me feel
Just like a Queen!
Roses are white
and some are yellow~
You are my hero,
You handsome fellow!
Roses are purple, pink,
and sterling silver~
I will love you
for ever and ever!
Some are red,
like deep, rich wine~
Will you be
My Valentine?
(I told you it was cheesy!) But anyway, what will you be putting in YOUR Valentine's card? Will you write a poem, a letter, or stamp a sentiment?
******************
Happy Friday! Love is in the air...I get to spend today with a few of my favorite girlfriends; we call our little group the "Design Divas." We try to get together once each month and share recent cards, LOs, or projects we have made. There is always lots of inspiration to be found in our monthly meetings. I can't wait to see them later today! My weekend will be off to a great start! June Houck
I made this little card yesterday. I was actually looking for my SU butterflies embosslit, and I can't find it! I am an organized person, and I am so frustrated that it is not in any logical place I can think of...I opted for my Martha Stewart butterfly punches. Has this ever happened to you?
I used my cricut cartridge Plantin Schoolbook to cut the hearts and I embossed them with the Cuttlebug Birds & Swirls embossing folder. The adhesive lace is by Hero Arts and the paper from Creative Imaginations.
How was your week?? I've been kinda busy, but not 'scrappy' busy. That is why today I'm just going to BRAG!! I received an email from my daughter-in-law that Nina got a Silver Certificate and a Citizens Award. She missed getting a Gold by one A on her report card. I am so proud of her for all those Bs and the A!!..The Citizens Award was because she is helpful, courteous and all the great stuff in a student that a teacher appreciates. Not being sent to the 'office' is a big plus..lol..Glad she didn't take after me on that one..lol..
This is Nina with a doll she recieved for Christmas. Funny, she acts so grown up at 7, but still loves her dolls..I love her soooooo much!!!
********************
We hope you are having a wonderfully creative week, and will post your cards and other creations to our LINKZ on Wednesday. Use ribbon in any creative way, and post there!
The LINKZ here is for posting whatever makes you happy!! You could be the winner of our Feb. Blog Candy package!!! All comments and posts will be eligible, and the winner will be announced on March 2nd!
Happy Monday! This week our HoneyBee inspiration for you is to use ribbons in creative ways. I had the idea for this card in my head, but I was not sure how it might evolve. I wanted to cut the heart out on my Cricut machine (though you could use a punch, die or cutting template.) I got my Cricut machine almost 3 months ago and I have had fun learning how to use it via both trial & error on my part and Betty Bee's sage advice! Are you ready to learn how to cut a Cricut aperture and/or make a quick and easy card?
What I learned about my cricut: navigation keys- these are the directional buttons surrounding the CUT button on the cricut. feature keys- multicut, center point, flip, line return, settings, mat size,...
To cut an aperture:
Use the navigation keys to place the blade at the center point of your image. After loading your paper and selecting your image (I used 3 1/4" heart from the Accent Essentials cartridge), press the CENTER POINT feature key and CUT.
Card directions: 1. Cut white card stock @ 4"x5 1/4". Cut aperture. Emboss as desired (I used Cuttlebug Heart Blocks embossing folder.)
2. Cut a 3 5/8" square and cut off one corner. Apply adhesive (I used my xyron.) Adhere a variety of ribbons. The back will look like this if you want the ribbons to be diagonal: This is the front view: 3. Trim off excess ribbon, if necessary: 4. Position your ribbon panel (cut off corner at top), and cut off the two adjacent corners that are sticking out behind your white layer. Adhere behind the aperture. (I chose to use a corner rounder on the top corners to mimic the heart shape.) 5. Adhere to coordinating card stock (8 1/2" x 4 1/4"). (Round top corners, if desired.) I also added a metal charm from my stash. I think I will try this again; I like this idea for using up ribbon scraps or as a way to use neglected ribbons in my stash.
Please come back on Wednesday for our HoneyBee Showcase on other creative ways to use ribbon. We hope you will link your fun ribbon projects. If you have time to leave a comment, that would be really nice, too.
Yay, it's Friday, and that means another weekend in the hive! The HoneyBees have been quite concerned about those of you who are being affected by the terrible weather. We hope that you are safe, warm, and have all that you need. Please be very careful! We really care about you.
Happy Friday! This is HoneyBee June Houck wishing you a lots of fun for February. The buzz around the Houck house has involved unpacking boxes in my dining room, washing the bowls, dishes, and crystal, and polishing silver. My mom and dad visited yesterday and did the vast majority of the work (I did fix them lunch!) Today I will finish up a few more pieces of silver to polish and start putting all of it away in my china closet. I will also finish turning my old craft room into a guest bedroom. I hung pictures yesterday, and I just need to wash the linens and make up the bed. This will complete the faux move (we had all of our wall-to-wall carpeting replaced with laminate and hard wood.)
Can I get a 'wahey'? My "lucky in love" card (previous post) was chosen to be on the Share the Mojo blog!
What's the buzz in your hive? Leave us a lovely comment. We enjoy knowing what our readers are up to :)
I am so excited to share with you my fun SWARM weekend in Punta Gorda!!..Last weekend, our Miss Betty had one of her awesome SWARMs and I had the opportunity to host 'Rosie's Casino'. This is just what I needed after spending time in the hospital. Of course, it also gave me the motivation to get well and though I was not quite there, I was well enough to go, host and have a blast!!..
On a previous SWARM, I had mentioned that the Chippndales were going to be at Rosie's Casino and guess what...the 'chipsndales' were there! I found clipart online of the Chip and Dale, printed them on 8 1/2 x 11 and cut. A little added Copic was used to highlight some of the features. I then saved some that had various hats and using my Paint Shop Pro, cropped the hat, sized it to fit my 'guys' and then glittered them up. Now, you know they needed clothes!!..I made templates of the bow ties and 'briefs', scanned them and then had my Make The Cut cut them for me. Taking a $10.00 bill from my husband, I scanned that and sized it for tucking in...lol..
Now, what would the point be having them there if they weren't going to dance??!! I was going to dance with them, but breathing was not too good for me that day. So, Betty was sweet enough to do her thing with 'my guys'!!! You can't hear the song to well, but it's 'I like to Move It'...How can you not 'move it' when you hear that song?!!..lol..
After a day of games, fun and prizes, we had chocolate covered cherries and non-alcoholic champagne!
****************
Betty Brett
I have a tip to share with you today. I love my new Martha Stewart scoring board, but I was wishing it was easier to quickly pick out the most often used grooves. SO, with a blue fine line marker, it was very easy to highlight the inch marks, and with red, I marked the 4 1/4 groove. Now scoring A2 cards is a snap! If I decide to add gate fold measurements, or any other specific folds, they can be marked with a different color.
Congratulations to BethanyR - the randomly chosen winner of our WHAT A CHARACTER challenge! Bethany will be receiving a Disney Princess Cuttlebug Set! Thanks to all who participate in our Showcases! We love seeing what you are creating:)
Do you have a great tip to share with us this week? What great things are happening in your life? Want to brag about some good news? Leave a comment, or post a link below! All participants will be entered into the drawing for our February Blog Candy (winner announced March 2nd).
Welcome to another wonderful Wednesday here in the Hive, and that means it's time for the HoneyBee Showcase! The HoneyBees are always buzzing with fun, new ideas, and today we are looking at new ways to look at hearts . With Valentine's Day fast approaching, we thought you would enjoy a few great ideas, starting with the box tutorial on Monday, and some great pieces today! Enjoy, and leave us some hunny letting us know what you think! *****************
Happy Groundhog Day! I sure hope Punxsutawney Phil does not see his shadow :)
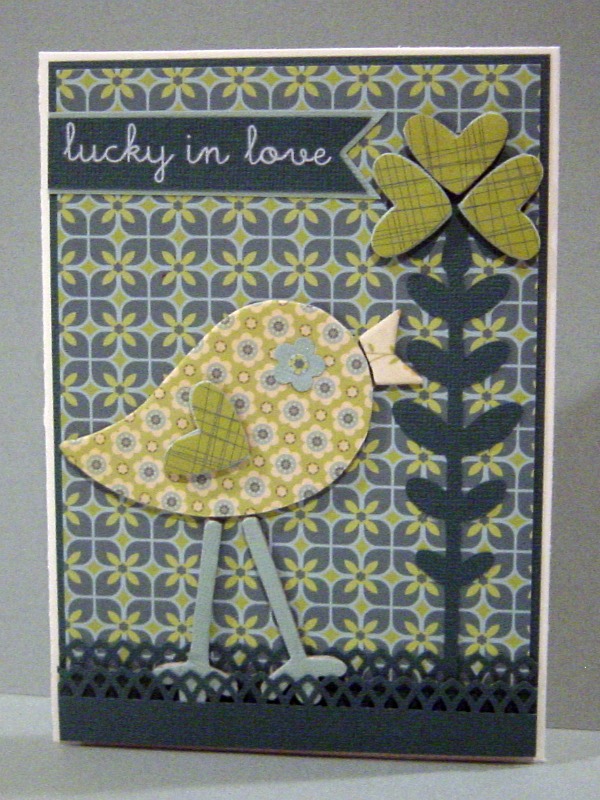
Our challenge this week is to use a heart in a clever way. I used one heart as the bird's wing and 3 hearts to create a shamrock. I don't send St. Patrick's Day cards, but I like to make cards that say "lucky to have you" or in this case:
"lucky in love." I suppose this could be a card for both Valentine's Day and St. Patrick's Day...killing two birds with one stone (sorry, bad pun!)
Supplies: Cosmo Cricket Early Bird 6x6 papers, Martha Stewart border punch; Cricut Lite Bloom cartridge; American Crafts rub-on alphabet Kate font; SU So Tweet chipboard,SU flower punch and SU heart punch; Augusta Green and Ponderosa Pine card stock; and foam tape.
I decided to make this cute little box. I printed it out and hand cut it. The hearts are punched with a Creative Memories punch. The Azalea opens up to show a lovely message in the middle.
Supplies: Azalea Explosion printed box and flower, White CS, Creative Memories Heart punch,
For my card, I got my inspiration from the talented Valita. Not sure why, but an upside down heart popped into my mind and a 'tent' was created..lol..I knew it was going to be a circus tent with a banner waving from the top. The 'pole' for the banner is a cocktail toothpick!..Not sure if you can see, but that is an escaped gorilla hiding in the tent..lol..
Our challenge this week is to use hearts in an unusual way. I was inspired by Valita from Australia, and her tutorial on this "Heart Couple"! Valita is a genius with punches and designs. Be sure to check out her blog here. Over the weekend a bunch of us were together for a Cricut Swarm, and following her instructions, I taught how to turn hearts into a tuxedoed gentleman, and his gowned lady! The challenge for the Cricuteers was to follow the tutorial, use the white eyelet card, and the colors red, black and pink! Take a look at what these amazing designers created!
Claire Walz
Susan Diller
Linda DuKor
Sandy Pennington
Olga Bales (Age 98!)
Kristi Driscoll
Betty Klebau
Carol-Lee Porter
Judy Ford
Now it's your turn! What unusual and creative way can you use a heart? Come back and leave a post so we can check out your card, layout, altered item, or other creative project!!
*********
Beth Ullman
Good afternoon HoneyBees here is either no show Beth or late Beth.......so sorry......anywho here is my contribution for todays post on Hearts.
I made a pocket heart using a template from Denise for a class at Crafters Digital Art Center......if you like digital fun group might want to check it out.
after cutting out my heart I embossed it using one of the newer cuttlebug folders Kassie than I adhered this white pleated lace around the heart after I changed the color to an old rose.
All my papers are from Stampin-Up made a tag for the pocket using a Victorian sticker to dress it up.
Subscribe to Get An Email Whenever There's Buzzing in the Hive!
Our very Sweet Followers
Be a Guest HoneyBee!
If you have a project or an idea for a challenge, please contact us at: BettyBeesBuzz@hotmail.com You could be a HoneyBee Guest Designer! Please submit your sample project, and in the subject line type: HONEYBEE GUEST DESIGNER IDEA
We would love to hear from you!!


 and the HoneyBees


 Happy Friday! Love is in the air...I get to spend today with a few of my favorite girlfriends; we call our little group the "Design Divas." We try to get together once each month and share recent cards, LOs, or projects we have made. There is always lots of inspiration to be found in our monthly meetings. I can't wait to see them later today! My weekend will be off to a great start!
 June Houck

 Happy Monday! This week our HoneyBee inspiration for you is to use ribbons in creative ways. I had the idea for this card in my head, but I was not sure how it might evolve. I wanted to cut the heart out on my Cricut machine (though you could use a punch, die or cutting template.) I got my Cricut machine almost 3 months ago and I have had fun learning how to use it via both trial & error on my part and Betty Bee's sage advice! Are you ready to learn how to cut a Cricut aperture and/or make a quick and easy card?
 This is the front view:
 3. Trim off excess ribbon, if necessary:
 4. Position your ribbon panel (cut off corner at top), and cut off the two adjacent corners that are sticking out behind your white layer. Adhere behind the aperture. (I chose to use a corner rounder on the top corners to mimic the heart shape.)
 I also added a metal charm from my stash. I think I will try this again; I like this idea for using up ribbon scraps or as a way to use neglected ribbons in my stash.
 Happy Friday! This is HoneyBee June Houck wishing you a lots of fun for February. The buzz around the Houck house has involved unpacking boxes in my dining room, washing the bowls, dishes, and crystal, and polishing silver. My mom and dad visited yesterday and did the vast majority of the work (I did fix them lunch!) Today I will finish up a few more pieces of silver to polish and start putting all of it away in my china closet. I will also finish turning my old craft room into a guest bedroom. I hung pictures yesterday, and I just need to wash the linens and make up the bed. This will complete the faux move (we had all of our wall-to-wall carpeting replaced with laminate and hard wood.)


 "lucky in love." I suppose this could be a card for both Valentine's Day and St. Patrick's Day...killing two birds with one stone (sorry, bad pun!)


 June Houck
