Monday, May 2, 2011

Monday Motivational - Three-tiered slider card for Mom

Good morning, and welcome to Monday Motivational in the hive!  HoneyBee Judy has a very inventive project for us this week!  She was inspired to create a moving card for Mom, and we hope you'll be moved to join right in!
                                                             *******************


For my Monday Motivational Challenge I want to show you how to do a three tiered slider card. My inspiration was a design from Splitcoast Stampers by Heather Summers. The one I'm making has different paper measurements, and will be for Mother's Day.
Gather together:
4 different patterned papers
(Base piece 12 x 4 1/2; Middle piece - 11 x 3 1/2in; Top piece 9 1/2 x 3in;
 4th color for matting and embellishments)
2 pieces of cardstock, 1/2 x 3in for slider tabs

Matted pieces 1 x 2 3/4 for top image; 1 3/4 x 3 inch for middle image; 2 x 3 1/2 bottom image

Paper cutter or craft knife, Ribbon or tab for top pull

Adhesive

Stamps and Ink, Cricut Cuts, Punches or Embellishments as needed

Here are the instructions for putting the card together:

Starting with the base piece - (12x 4 1/2) . Fold in thirds. (When folded it will measure approx. 4 x 4 1/2). Crease folds. (Open back up - face down) On the right third you are going to make two slots with your papercutter.TIP: On the edge of the orange cutter slider is a pointer - that's where the blade will cut.  Other cutters also have a marker to let you be precise.


One cut will be 1 inch from the fold line on the left and one cut will be 1 inch from the right edge - starting 1/2 inch from the top and stopping 1/2 inch from the bottom. (the slots will be about 3 1/2 inches long).


Now with the middle piece 11x 3 1/2:  Fold in thirds. Cut two more slots with your papercutter as you did on the base piece.  These cuts are also 1 inch from the fold line on the left and 1 inch from the right edge - this time 1/4 inch from the top and bottom. (the slots will be about 3 inches long).  You can see the slider pieces threaded into the slots in the photographs.


Now the top tier:  Fold in thirds. Place adhesive on far left edge to secure closed. Make a bee-utiful bow with your "I Love You, Mom" bow maker, or Bow Easy Bow Maker,  and attach to the top edge, or you could use a tab pull if it is more approprite for your design. Take the middle piece and place face down on your work surface with the slots to your right. Weave the cardstock slider piece thru the slots. Fold the patterned paper over and gently fold the ends around it. Move slider to the top of the slots. This creates the sliding mechanism for this tier.

Center the top piece in the center third with the right sides face down. The bottom edge should be inline with the slider bar. Apply adhesive to the slider bar. Fold over and attach to the bottom edge of the top tier. Apply adhesive to the far left edge and close this third making sure not to adher the slider mechanism. Now pull on the ribbon gently and see how the tier slides!!!

Repeat the steps to attach the middle tier to the base piece.
Add your matted pieces and embellishments.
Your card is now finished! Here is the card opened and embellished for my mom!!! I used my Martha Stewart corner punch and lots of bling embellishments. My Mom loves pink and bling!  When you're 99 years young you should get lots of things you love!!!!


A few tips: it's only paper - don't be afraid to give it a try!

Use patterned paper for this card as the thinner paper is easier to slide.

Don't do too many layers on the top and middle tiers, if it's too thick it will be hard to slide.

You can place a gift card in the top tier slot if you'd like another surprise for your mom!!


Thanks for looking! Give it a try! It is MUCH easier to do than it is to explain!!

Slider cards are in your future! Have FUN!!!


Photobucket

Friday, April 29, 2011

Buzz, Brag and Bee Happy April 29


Happy Friday, one and all. Now, where is my tiara??? I hope you are watching the Royal Wedding this morning! Kate is certainly a beautiful bride, and we wish them a lifetime of happiness!


Now, to more serious things.... we send our very best to all of those who have been affected by the terrible storms that have ravaged the southern United States. Several of the HoneyBees are from South Florida, and we have experienced this kind of devastation, and we understand how awful this is... our prayers are with you.

Now for some BUZZ: When blog hopping the other day, I saw the coolest tip! Remember our twine week a little while back? Mary Anne of Scrappy, Sticky, Inky Mess has come up with a "Do It Yourself" technique for making your own twine, and it's awesome!


Be sure to check it out.... she even has a video!!


Well, before I go, I couldn't resist sharing a new picture of a couple of my little ones... It might not be the best picture of Paisley, but couldn't you just kiss that Porter's face right off!!!

Have a wonderful weekend, and we'll see you right back here on Monday with a fantastic Monday Motivational!


Betty Brett


***********


Happy Friday dear visitors!! I almost bought a new van (2011 Dodge Caravan), but the dealer didn't like my price. Too bad, because it was only $4,000.00 less than what they wanted. No problem, there are other dealers and other vans. For today I thought I would share with you a couple videos from last Saturday. Joe and I went to Sarasota to visit our son Jeff and family. Joe wanted to do an Easter egg hunt for Nina and Ian and then we had Nina hide an egg for Jeff and Ian for his mom, Samantha. Too much fun!! I explained to Ian not to tell mommy where the egg was...Ok,. look at the video...lol


Saturday afternoon Nina, Ian, Samantha and I went to the mall to visit Build A Bear. Nina got a leopard and Ian got a puppy. Here is a short video of Ian doing the Build A Bear ritual.


**************


June Houck


Happy Friday! I did get a car this week, but not a van. I have never wanted a van, but I do like my small gold 2000 SUV. Our 1994 blue Honda Accord has broken down 3 Thursdays in a row. I teased dh and reminded him to never drive the Honda on a Thursday from now on. We went looking for a car, and I decided to get the same small SUV (I'm a creature of habit.) My new SUV is a 2008. The dealer wanted me to trade in my 2000 SUV and I said, "No way! I love that car." Now I have two SUVs…my new one has heated seats; love that :) She is silver, so I named her "Silver Queen."

******************

Wow Can't bee-lieve it's Friday Already! My daughter Michelle is here this week visiting from Pennsylvania. We have been busy catching up, eating out and packing her stored stuff to take back to PA on Sunday.

Hope you all have a blessed week! Hug your family! BEE Happy!!!

Judy Ford


Don't forget to create an IRIS FOLDING project, and post on Wednesday's link!

You could be our winner for this week!

Now, it's your turn! Leave your comments and Links... share your BUZZ, things you'd like to BRAG about, and things you are HAPPY about!!


Photobucket


Wednesday, April 27, 2011

HoneyBee Showcase - Iris Folding April 27

Happy Wednesday, and welcome to another HoneyBee Showcase Challenge!  We hope you enjoyed our tutorial Monday on how to do IRIS FOLDING!  We shared where to get four FREE geometric shapes, and today the HoneyBees are sharing their take on the theme... then it's YOUR TURN!!!
********** 
I promised that I would show you an Iris Folding card done with ribbon, and here it is!  I must admit, this is even easier than with paper strips, and that's really something, because the strips are easy, too!  Using monochromatic themes, especially white, is a favorite of mine for weddings, so this really worked!    
Here is an up close shot of the center, and you can see how pretty the layers of satin are, leaving a perfect triangle for the heart charm.  This is another FREE pattern from Cards and Crafts. 

Recipe:
Georgia Pacific Paper
Sizzix Argyle Large, Hello Friend Embossing Folder
Cuttlebug
Heart Coluzzle, and Swivel Knife
Love Heart Charm by Modern Romance (Michael's)
Oval Nestabilitie
Stampin'Up Stamp
Memento Ink
Patterned Ribbon from Stash
White Offray Ribbon

This is the card I showed in the tutorial on Monday, and if you missed it, click here, and you will learn all about how to do your own IRIS FOLDING, and you can play right along with us this week!!


Betty Bee
*******************


This is my card for showcasing Queen Honeybee Betty 's Iris folding technique. I used patterned papers from my stash. I love purples!!!
Then I tried it with 5 ribbons (one of those coordinated packs of ribbons from my stash)
and used the pattern that Queen Bee provided for us!
I like this one even better. More rotation and swirl!!!Thanks Betty for a great tutorial!
Hope you feel better soon Honeybee Wanda!
Hope you all link up with us at Betty Bee's Buzz and show us your Iris Folds!!!


Judy Ford

****************


Iris folding is one of my favorite techniques. It is one of the first classes I ever taught at area stamping stores. I love to use metallic Asian-theme papers or wrapping paper. For this card I used both! Autumn colors are my favorite, and pears are one of my favorite fruits.


Betty provided a wonderful iris folding tutorial for us on Monday. I hope you will give it a try! I find iris folding very therapeutic, much like coloring.
                                                      ***********************


Rosemary
 

What a fun challenge we had this week!!..I love doing Iris Folding and haven't done it in a long time.  This was a perfect reason for me to try a new template.  I found my pattern at Circle Of Crafters who has so many cute patterns to choose from.  The pattern I used is called Sunbonnet Sue.


Look who is late again......and because I am late I will be sharing 2 cards with you, I love Iris Folding and hope to see a lot of you jump in here and join us this week.......Betty's tutorial was fabulous and we sure have some beautiful inspiration here from the rest of the HoneyBees so what do you say lets out do ourselves with sharing this week.

I went for the sky with my cards I have this book that has been in my stash for years from Craft Special Iris Folding with envelopes except didn't use envelopes had papers from Design Originals that I used.

For the second one same book same papers but I added a little stitching for the ropes and faux stitching on the basket........hope you have enjoyed our post today.

Now it's YOUR TURN!  Get a pattern, pick out your favorite papers or ribbons, and give it a try!  Come back and show us what you made, and you could be the winner of 20 yards of OFFRAY RIBBON!!!  Post to the link below, or send us an email to the address above, and you are entered!  If you send a friend, and leave us a comment or send an email to tell us about it, we'll enter your name twice!!  We can't wait to visit your blogs <)))O< 


Photobucketand the HoneyBees


Monday, April 25, 2011

Monday Motivational, Iris Folding


Good morning, and welcome to Monday Motivational here in the Hive!  We hope you had a wonderful weekend, and enjoyed your Easter! 
 
I'm Betty Brett, better known around here as BettyBee, and it is my pleasure today to share today's inspiration with you.   We have all been a-buzz about IRIS FOLDING, and our HoneyBee Wanda was going to be sharing this with you, as she is our resident expert...
however, she's a bit under the weather at the moment, so your Queen Bee is going to do the honors!
 
BUT FIRST...
I want to show you what was in our Easter Basket!!

Betty Brett

 Our newest granddaughter, Erin Amanda, was born on Thursday, and here she is!  Just add bunny ears, and the Just Hatched outfit, that I made with the Freezer Paper technique, that we showcased a couple of weeks ago!  How cute is this???
And, is there anything more precious than this???  Her little bloomers were exactly the same colors as some of the eggs...  Thanks, Easter Bunny!!! 
**************
Now, on with your regularly scheduled programming!

This is IRIS FOLDING!  It is a very old technique, that originated in Holland, and is called this, because the opening in the center represents the IRIS of a camera, or the eye.  There are a few basic folding shapes, and myriads of cut aperture (opening) shapes to lay over the top.  It is a very easy craft to follow, and the results are quite fun.

First, start with a pattern.  This one is a PENTAGON pattern, which means it has FIVE SIDES, and will typically require five different color papers to get the desired results.  I got this pattern from a FREE WEBSITE that I GOOGLED... called HandcraftedGreetings  They offer several different patterns, all in PDF format, and are very easy to download.  There are a number of other sites out there with free patterns, so this is a budget friendly class!!

These are my five pieces of patterned paper that I chose for my project.  Paper is important in this craft.  It should be more lightweight than heavy, because you will be folding it in half, creating an finished edge, so there will be a fair amount of bulk, and heavier papers don't work well.  Wrapping paper, magazine pages, origami, and thinner designer papers are perfect.  Ribbon can also be used, but it doesn't have to be folded.

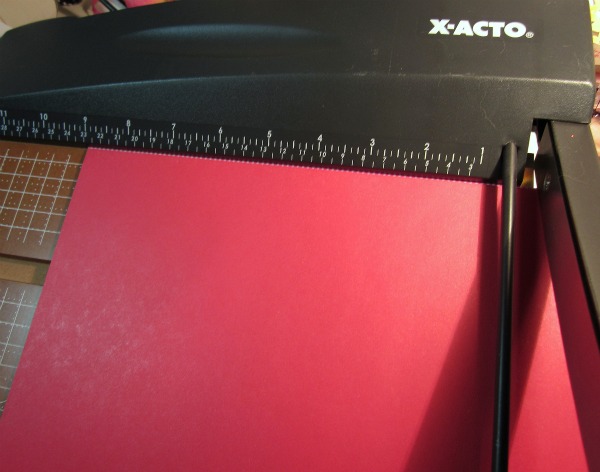
The next step is to cut one inch wide strips of your papers.  I have a very nice X-Acto guillotine cutter, so I was able to cut all 5 sheets at once.  But, if you only have a paper trimmer, that will also work very easily.  Using 12 x 12 paper, I cut three strips of each color, and had PLENTY left over!  LOL Just use whatever you have.  This is a great project for scraps!

This is my own handy dandy little trick.... since these strips all need to be folded in half, I pulled out my trusty Martha scoring board, and quickly gave a little stack of strips a scoring line right down the middle!  That made folding these little strips of paper a snap!   Now, I will mention here that I've only done this craft once before, and that time we were given instructions to make so many strips X inches long, and so many Y inches long, and so many Z inches long, and.... and.... and.... Well, you get it!  This time I just left my strips the full 12 inch length, and trimmed them each time I placed a paper exactly where I wanted it.  Worked like a charm, and no wasted paper!   
 
Here are my beautiful folded strips, all laid out in color specific order... this is important... don't get your colors mixed up!  You will be putting them down in order, so just keep them in order, and it will go very smoothly!

For my opening, I decided to do a five petal flower.  I chose one from George, a Cricut Cartridge, and cut it at 3 1/2 inches.  It isn't exactly symmetrical, but it will work nicely.   You can cut your opening with any die cutting machine, embossing machine, or by hand.

Here is the flower laid over the IRIS FOLDING template, and gently taped into place (with removable tape), so it won't slip. Don't worry if your pattern isn't the EXACT size.. your papers will cover the opening, and it will be fine.  If the opening is a little bit larger than the pattern, like mine was in two small places, I just added two additional strips, and it was perfect!

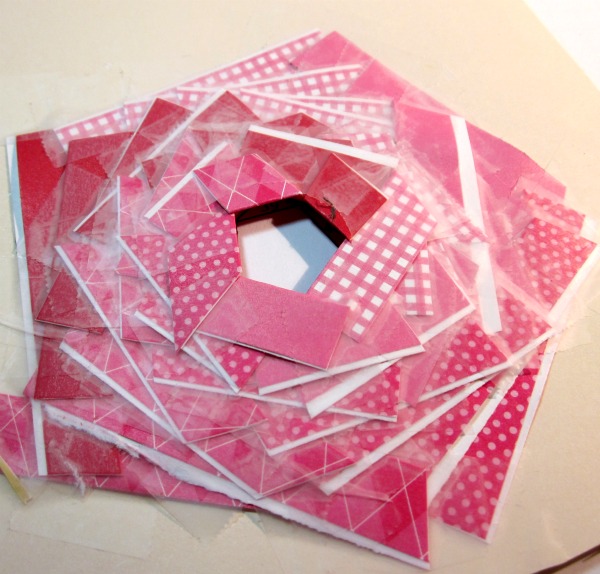
Here we go!  Just simply tape a strip of color number 1 on top of the place where pattern number 1 is.  Trim and tape into place.  Move on to color number 2.  Lay in place, trim and tape.  Keep following the numbers in order. 

Here we are finished with the first round.  It was easy!  Just like Paint By Number!

So, here we are all finished!  OK, so it's not all that pretty on the back, and there's a bunch of tape there, BUT it went pretty fast, and now you're excited to flip it over and see how it looks!
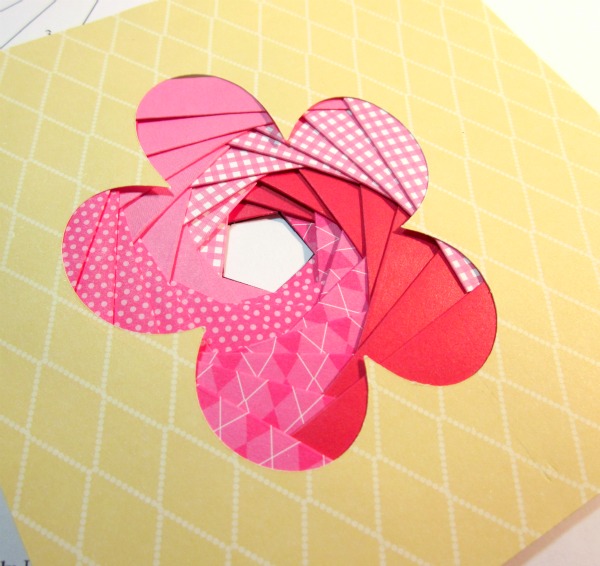
VOILA'!!!  Isn't that neat!  And look at the IRIS in the center!  This is the PENTAGON pattern, and the five sided shape is very evident!  Now it's time to finish the center.

I opted to repeat the yellow paper that I had used on the outside of the card, and then added a gorgeous pink gem to reflect the pinks in the papers. 
Here is my finished card.  It is a special "thank you" for a friend who gave me a great big pad of scrapbook paper... and these came out of it!   Adhering the card front to the card base with dimensionals is helpful in compensating for the bulk of the paper and tape.  It doesn't look thick or awkward at all.
I do hope you have enjoyed the tutorial, and will give it a try!  Come back on Wednesday and see what the HoneyBees have created, and that is where you will find the link to post your IRIS FOLDING projects! I will try to get a ribbon project done for you by then.... want to see one??? 

Happy creating ~


Photobucket


Friday, April 22, 2011

Buzz, Brag and Bee Happy April 22, 2011

Happy Friday, and welcome to the Hive!!  We hope you have had a great week, and have enjoyed a touch of Christmas with the talented and inspiring girls from Jingle Belles!!  We have had a wonderful time with them, and with YOU!  Thanks to so many new viewers, as well as our regular readers, for participating this week!  Oh, so much inspiration abounds!! 
AND, without further ado.... our randomly chosen winner of our
CHRISTMAS TO DIE (CUT) FOR challenge is.....
{drum roll please}
^
^
^
^
The one and only, NOELLE McADAMS (entry #11)!!!
Noelle, Please send us an email at
BettyBee's Buzz at hotmail.com with your mailing address,
and your prize will be on it's way to you!! 
*************


Betty Brett
Today has been another blessed day in our family, and this is where we have the opportunity to share the things that make us the happiest with you, our friends.  I know you've been following along with the birth of our granddaughters, and tonight our newest little one made her entrance into the world!!  
 Here are our son, Doug, his beautiful wife, Brianne, and their first child, Miss Erin Amanda!  She was born five hours ago, and weighed 7 pounds and 10 ounces.  She and Mommy are doing just beautifully.
Here is one very proud and delighted Daddy introducing his beautiful daughter to one very, very happy Nana!!   We couldn't be any more grateful for our blessings of seven happy, healthy grandchildren, and their wonderful parents.  Praise the Lord!!!
*******************


Happy Friday!  Today I am driving back to VA from NC with my dds.  I spent the week with my best girlfriends craft store shopping and making cards for the troops (Operation Write Home.)  I am excited to spend Sunday with my parents and my grandma.  We are planning a little Easter egg hunt in the yard, weather permitting.

Thank you to all of you who were able to leave a comment and/or participate in our cross-pollination challenge with Jingle Belles challenge blog this past week.  I really enjoyed this challenge!  I found lots of inspiration and met some really sweet crafters.

***************************


Every Friday at Betty Bee's Buzz it's time for Buzz, Brag and Bee Happy!!!


This Friday I'm bragging. My youngest grandson is going to be starting kindergarten in the fall. He is all excited about getting to ride a bus and everything. I'm so worried about him because like his Grandma Judy, he is so shy and quiet... ROTFLMBO!!! He even knows a couple of the other kids from Squirt Soccer and Tball. That poor teacher! Should I warn her or let her suggest find out for herself?????!!!


Been getting lots of exercise working outside picking up branches! I love my old trees in our yard. Beautiful Boughs stretching out to the sky BUT lots of work after ice storms and high winds! Then will come the fall raking, but in between the beautiful maple leaves shade the deck and back yard as light twinkles thru the leaves!!! True Heaven on Earth!


So what's happening in your section of the blog world? Lots of bee-u-tiful cards linked up at Jingle Belles Rock and Betty Bee's Buzz for our cross-pollinating, and I hope you've already checked them out!
*********************
We are wishing our HoneyBee Wanda a speedy recovery.  She hasn't been feeling well at all, and is in need of our prayers for an easier time of it.  I know you will want to join us in sending her Get Well honey...
*********************

 We'll see you back here on Monday for our Monday Motivational!  In the meantime, have a very Happy Easter, and take time to count your blessings, and be grateful!  It will make everything seem brighter!

How about leaving a bunch of comments, and let us know what you are happy about!!!  You can leave them in the comment section, or, if there are photos involved, leave them in the links below!  We want to celebrate with you!!!


Photobucket


and the HoneyBees