


 |
| Betty Brett |


And, is there anything more precious than this??? Her little bloomers were exactly the same colors as some of the eggs... Thanks, Easter Bunny!!!
**************
Now, on with your regularly scheduled programming!


First, start with a pattern. This one is a PENTAGON pattern, which means it has FIVE SIDES, and will typically require five different color papers to get the desired results. I got this pattern from a FREE WEBSITE that I GOOGLED... called HandcraftedGreetings They offer several different patterns, all in PDF format, and are very easy to download. There are a number of other sites out there with free patterns, so this is a budget friendly class!!

These are my five pieces of patterned paper that I chose for my project. Paper is important in this craft. It should be more lightweight than heavy, because you will be folding it in half, creating an finished edge, so there will be a fair amount of bulk, and heavier papers don't work well. Wrapping paper, magazine pages, origami, and thinner designer papers are perfect. Ribbon can also be used, but it doesn't have to be folded.
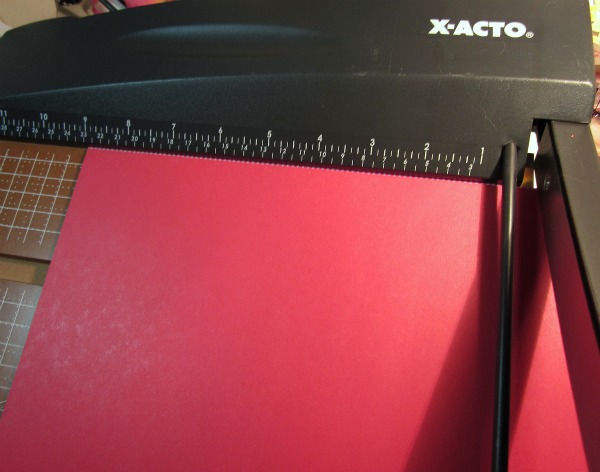
The next step is to cut one inch wide strips of your papers. I have a very nice X-Acto guillotine cutter, so I was able to cut all 5 sheets at once. But, if you only have a paper trimmer, that will also work very easily. Using 12 x 12 paper, I cut three strips of each color, and had PLENTY left over! LOL Just use whatever you have. This is a great project for scraps!


Here are my beautiful folded strips, all laid out in color specific order... this is important... don't get your colors mixed up! You will be putting them down in order, so just keep them in order, and it will go very smoothly!

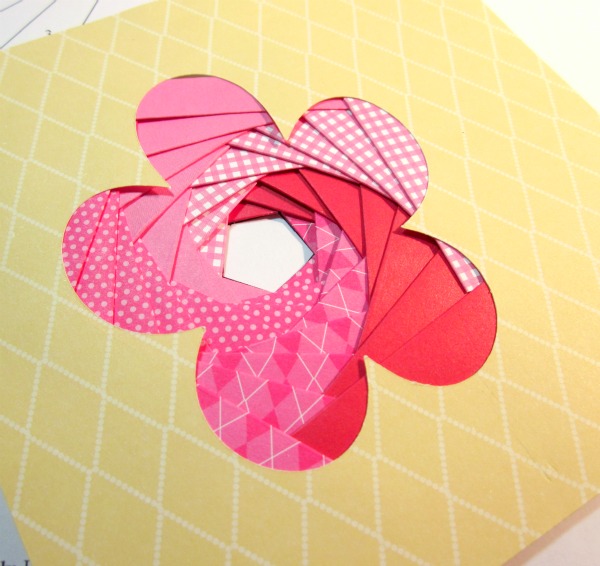
For my opening, I decided to do a five petal flower. I chose one from George, a Cricut Cartridge, and cut it at 3 1/2 inches. It isn't exactly symmetrical, but it will work nicely. You can cut your opening with any die cutting machine, embossing machine, or by hand.

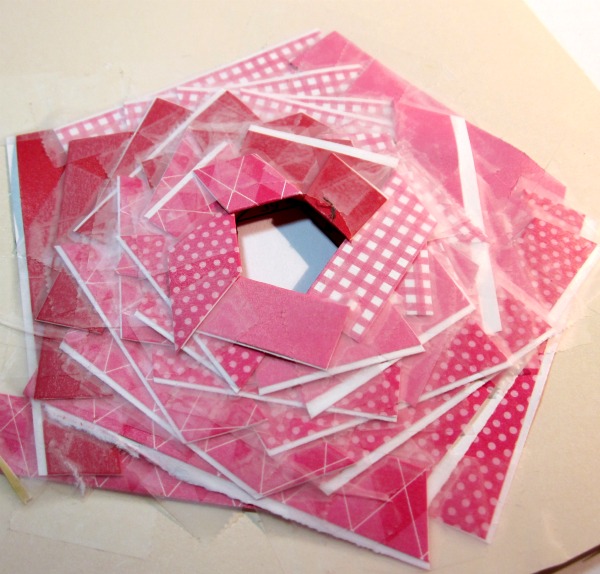
Here is the flower laid over the IRIS FOLDING template, and gently taped into place (with removable tape), so it won't slip. Don't worry if your pattern isn't the EXACT size.. your papers will cover the opening, and it will be fine. If the opening is a little bit larger than the pattern, like mine was in two small places, I just added two additional strips, and it was perfect!

Here we go! Just simply tape a strip of color number 1 on top of the place where pattern number 1 is. Trim and tape into place. Move on to color number 2. Lay in place, trim and tape. Keep following the numbers in order.

Here we are finished with the first round. It was easy! Just like Paint By Number!

Here is my finished card. It is a special "thank you" for a friend who gave me a great big pad of scrapbook paper... and these came out of it! Adhering the card front to the card base with dimensionals is helpful in compensating for the bulk of the paper and tape. It doesn't look thick or awkward at all.
I do hope you have enjoyed the tutorial, and will give it a try! Come back on Wednesday and see what the HoneyBees have created, and that is where you will find the link to post your IRIS FOLDING projects! I will try to get a ribbon project done for you by then.... want to see one???
Happy creating ~


9 comments:
Bee-u-ti-ful! Especially the new granddaughter! Can't wait to give this a try!!! thanks for the motivation!
Just saw this over on your blog and like I said there...hope Wanda is feeling better and both the card and the grandaughter are perfect!!
Melissa
www.disneydreamerdesigns.blogspot.com
Oh Betty, what a super sweet Easter Basket you have!!..I would love to just give that bunny a hug!! Love your card!!..I have my pattern and I'm set to go!! Hugs Wanda..♥
That is the best Easter Basket ever!!! And your project is simply gorgeous too!
Another beautiful baby granddaughter. You must be on cloud 9! Your iris folding card is so pretty; I like the flower aperture :)
Happy Grammy!!! is a Happy Grandbaby!! Thanks for this iris lesson too.
The Grandbaby is beautiful and the pictures are adorable.
Your card and tutorial are fantastic. Thank you.
awe she is so precious!! babies are such a blessing and i know you are going to enjoy every moment you get with her :)
fab card and thanks for the wonderful tut :)
Thank you ffor sharing
Post a Comment