Monday, January 31, 2011

Monday Motivational - Have A Heart


Betty Brett

 
Happy Monday, and welcome to Monday Motivational here at BettyBee's Buzz!!   Our theme for this week is "Have a Heart" and I am so pleased to bring you a different sort of tutorial.... one that was shared with us by Terri Moore, of Life with Terri.  She created a beautiful flower covered heart box, and offered the SVG file on her blog.  Please be sure to check it out, by clicking on her Blog Title, and leave her some love from us!    My version is featured above, and I will take you step-by-step through how I made it. 


Here is the computer screen, showing MAKE THE CUT, and the first pattern, which is the top of the box.


The Cricut cuts beautifully when directed by the computer program.  I chose Core'dinations Jewel Paper for this project.

The next image is of the side strips, which I cut at 1 1/4 inch, and then scored at 1/4 inch.  Fold along the score line.

In order for the strips to follow the shape of the heart, you clip the 1/4 inch edge all the way to the fold, with lots of little snips!

Here you can see how it glues to the edge of the bottom of the, now developing, heart box!  The little clothes pin helped hold the end while I worked the side.  I used Beacon's 3 in 1 Glue.


Next came the top for the box, so I put it in the Meadow Lark Cuttlebug Embossing Folder, and with a quick turn of the handle....
....this magnificent design appeared on the heart! 
Included in the downloadable SVG file is a VERY slightly smaller liner for the inside of the box.
When glued in place it covers the folded in edges of the sides, and leaves no unsightly seams anywhere. 

Here is the box all put together!  And now the REAL FUN begins!!
It's time to start to decorate the box!  I used Marco's Luxurious Pearl finished paper for the trim, and a Martha Stewart punch for the side.  To help the cardstock fit very easily, I pulled it through my thumb and forefinger slightly, giving it an easy curve.
And here we have a very pretty box, worthy of your very best treasures! (Like the beautiful earrings inside, made by my friend, Judy Ford!!)

But, I decided to add another gift to the gift :)


I created a small corsage, which is only temporarily attached to the box,

so someone very special can take it off, and wear it on her dress!  Wouldn't these be spectacular for a bridal party?  Easter, Mother's Day, Graduation, Birthday ... What ideas can YOU come up with? 

The HoneyBees are hard at work, buzzing around creating wonderful new ways to showcase Hearts this week.... we hope you will also Have a Heart and play along with us! 

Don't forget there is still another week for the LINKZ on the Silhouettes from last week, too!  Thanks to those who have already submitted your GORGEOUS projects!  They are terrific!  And Tori is just delighted to have inspired so many of you.  Don't forget to leave her some love, too! 

Thanks for stopping by today.  We really appreciate your visits to the Bee Hive!!!  We'll see you on Wednesday for the HoneyBee Showcase! 

Photobucket

Friday, January 28, 2011

Buzz, Brag, & Bee Happy Friday - Jan. 28th

Betty and Claire
********************


Hello everyone from Punta Gorda!!..Happy Friday!! I'm filling in for Miss Betty today because she is busy 'swarming' this weekend!!  Though I am here too, she is busy setting up everything for our fun weekend together. 

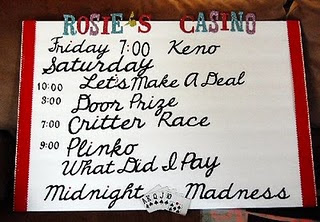
 I am so excited to be hosting 'Rosie's Casino' full of fun and games.  I wanted to share with you a couple things I made to show what will be happening Friday night and Saturday.  Next week I'm sure there will be more photos to share and hopefully a video!!


********************


Happy Friday! Are you ready to enter my happy place? I have finished moving my craft room from an upstairs bedroom to a room in our basement. I opened one of the french doors for the purposes of taking this entrance picture.
June Houck
My work space...do you see my Making Memories jars on top of the bookcase? Last weekend I sorted all of my ribbon scraps by color and placed them in those jars. The closet door is open and you can see two of my stamp carts...we will peek in there later...
The view from my work station: (left) cricut & Big Shot on dresser; shelf holds ribbons, primas, and buttons, etc.; corner cabinet stores rub-ons, cards, SU papers and on top is a tree of cards from blog friends; on floor 2 shelf cabinet is my Bazzill & BasicGrey 12x12; 4 paper sorters with my tv/dvd player on top (currently listening to the Elvis Presley radio station!)
...a peek inside my closet. Lots of stamps...yep, I got A LOT of schtuff...now to go make a mess creating something for Betty Bee's Buzz :) Wanna come play?

Photobucket

Wednesday, January 26, 2011

HoneyBee Showcase - Silhouettes and Cameos

Welcome to the HoneyBee Showcase this Wednesday!  We have the pleasure of having a Guest Designer with this this week, and today we are showing a couple more of Tori Whitney's Painted Portrait Silhouettes.  If you missed the tutorial on Monday, be sure to check it out!  It was easy, and SO effective!!


Silhouettes can add the perfect touch of charm, as well as touching your heartstrings,
when they are used in just the right spot in your home decor.

Here are four more of Tori Whitney's Painted Portrait Silhouettes, like she showed us in Monday's Motivational tutorial.  Two facing left....
... and two facing right! 

Many thanks to Tori for being with us this week!  It is always such a pleasure to have a Guest Designer, and see some new and exciting projects!!

****************************

Good morning! I found this lovely cameo by Blue Moon at Michael's. I knew this had to make it to an elegant card. My inspiration for the sketch came from two different cards in the Jan./Feb. 2011 issue of Paper Crafts magazine. This will be the perfect card to give to my parents for their wedding anniversary next month.
 
                                                                      June Houck
I would love to see what you create...won't you make a cameo appearance (or silhouette...LOL) here at Betty Bee's Buzz?


                                                       **********************
Here is a beautiful piece by Court of Court's Crafts!

Good morning everyone! I am so excited to be participating in this week's Honey Bee Showcase! 

 
Recipe:
Cartridges: Heritage™ (charm and cameo) and Sentimentals™ (card base)
Embossing folder: Kassie's Brocade
Ribbon from my stash

********************

What a fun and easy project this was!!..Thank you Tori for showing us this simple technique to get an awesome silhouette!
I was lucky enough to find a photo that was just taken this past Christmas.  It is of Ian and mom puckering up to kiss.  How perfect is that!!  Following Tori's class on Monday, I used Americana Black acrylic paint.  Once the painting was done, it was an easy assemble to make this quick and simple card.

********************


Now it's your turn to share your silhouette and cameo projects!  We will leave the LINK open for a couple of weeks, so you have plenty of time to get the projects finished and posted.   All you need to do is post to your blog, or online gallery, and link the URL to the post below. 
Even if you can't leave a project, we appreciate hearing from you!  Leave a comment, and let us know how you like the projects, and perhaps ask a question, leave a request, or just say "hello" to the HoneyBees!


Photobucket
and the HoneyBees


Monday, January 24, 2011

Monday Motivational - Painted Photo Silhouettes


What is more precious than the silhouette of one of our little ones captured in elegant, rich black?
Here is a great tutorial on painting your photograph to get a very easy silhouette, 
 by our Guest Designer, Tori Whitney, of "Talk, Paper, Scissors".
Traditional silhouettes required special lighting, sitting v..e..r..y still, tracing the outline, and then some extremely talented cutting with special scissors... Well, Tori has a wonderfully kid friendly alternative to share with us today!  Painted Photo Silhouettes!!
 1.  Choose a photograph that has a profile of your subject.  A 5x7 enlargement works really well, but a 4x6 can work too.  
 2. Carefully trim out the shape of the head, being very careful to leave hair and eyelashes.


 3. Choose a good quality BLACK ACRYLIC paint, and apply in straight even strokes.  First in one direction, and then the other. 

 Here are two sizes of the same photo.... isn't that the cutest nose?
Apply your silhouette to a mat for framing, or for a very special Valentine!
How about silhouettes of the whole family?  When doing multiple silhouettes that need to match, take the photos at the same place, with the subjects siting the same way, so their heads will be the same size. 

Come back on Wednesday to see what the HoneyBees have to offer as we showcase 
Silhouettes and Cameos!!
We hope you have enjoyed Tori's tutorial, and will leave her some love!!! 

Happy crafting ~
BettyBee and the HoneyBees

Friday, January 21, 2011

Buzz Brag and Bee Happy Friday Jan 21


Welcome to this Friday's Buzz, Brag, and Bee Happy! I'm sure you've been hearing a lot of BUZZ about the upcoming CHA convention in LA, and our very own Court is headed that way! If you are going to be there, be sure to buzz by and say Hi!!
Also, if you are in the central Florida area, and are interested in classes for
Cricut, Cuttlebug and Copics, be sure to check out the class schedule
in Studio Bee!
****************************************************


I would like to share with you an album I did, along with my daughter-in-law, back in 2004. It all started when Jeff and Sam returned from NYC with two cute China doll dresses for Nina to wear. We thought how fun it would be to bring Nina to Epcot and dress her themed for each country. I would like to mention that I do not sew, but was able to make her a kimono!! I just love iron on binding..lol! This was a two day affair with Jeff joining us the second day. Nina was so good at allowing us to change her clothes and allowing cast members to hold and interact with her. The girl from Morocco dressed Nina with clothing from their store, and my heart melted when I saw her and swelled to see people standing around as if Nina were a celebrity. When we arrived at England, the girl there dressed Nina in a dress that cost about $150.00!!..Wow, what a fun surprise since I couldn’t buy it to dress her in. Nina was just learning to stand, so we were excited to get her standing up ‘holding’ the lion in China. This album was also done before I knew of all the scrapbooking supplies out there, and maybe that is why this is my favorite, because I really created it. The first album I ever did was the baby shower; and this was my second or third album.

Not sure why the slide is not working. Please try this link...thanks!


************

Here's an update from our Busy Bee June!!

The polyurethane forced us to a hotel last Saturday. Sunday dh & I came back to continue unpacking the basement with our computer, the girls toys, and my craft room. We had to open the windows and it was cold! Monday a.m. they put second coat of polyurethane down, and the odor is overwhelming! We drove to my parents' house in MD to stay. That night a snow/sleet storm came through and schools were closed. Hwy 70 had an accident and was closed in both directions, so we stayed in MD Tuesday night. Then both girls had bad head colds and have been home from school with nasty congestion and coughs.

The basement and upstairs are mostly put back together...enough that yesterday and today we are getting back to our normal routine. The family room is full of chairs that still need felt pads or magic sliders on the feet. Today the rug guy is coming to pick up our area rugs to be cleaned. The family room is now the only room with carpet, and I need to have it cleaned while the area rugs are gone. Next week I will start unpacking and washing my crystal and china and polishing my silver; I need a break from this for now and I want to craft!!! Julia was well enough to go to school today, but I have Kathryn with me...one child is so much easier than two, and she likes to be in my craft room with me, so maybe I can get something made today :)

Congratulations to Sharon for winning our Blog Candy in the Calendar projects, and to Shelly for the Faux Embossing projects!  We appreciate you following us here at the Hive!  Watch your email for notification!
Happy Friday and have a wonderful weekend!!!

************
We hope you have enjoyed our week of Characters, and remind you to share your projects with us on Wednesday's post, and you could win a Disney Princess Cuttlebug set!
Have a great weekend, and we'll be back Monday with more Motivation!!
Photobucketand the HoneyBees

Wednesday, January 19, 2011

HoneyBee Showcase - What a Character!

Welcome to today's HoneyBee Showcase, and you might get to see that the HoneyBees really are "characters"!!


This week our challenge was to use a character of some sort in our projects. It could be in the form of a Cricut cut, photo, stickers, stamp, or downloaded image.... whatever inspiration we wanted. In keeping with my personal goal of doing more scrapbook pages this year, I used my Mickey Font Cricut Cartridge to cut the EPCOT letters and the ticket on the layout above. I also downloaded the free Disney "Waltograph" font from dafont.com, so it was easy to do the lettering on my computer. The blackout image of Mickey is a Cuttlebug die cut called "TaDa", and I handcut the white shadow, which gave the right "POP" against the Echo Park background paper. I also used the Cuttlebug for texture, with the Seeing Spots folder on the red strip on the left.
I must admit that after doing cards for so long, that doing a scrapbook page was a challenge. I am really happy to have done it, and am very happy to have the memories of the day at Epcot with my friends saved for all time!

*********************************


I am so lucky to live near the 'Mouse' and to have a husband who works for Reedy Creek Improvement District. Because of his job, I can visit the parks anytime!! Ok, there are some block out times, but not enough to make it an inconvenience. I would like to share with you 3 of the many layouts I have from my Disney adventures.


For my first layout, this is actually from a Disney movie adventure!..What else but Toy Story 3.


How can you visit Disney without checking out Buzz!!!

This is me with Nina, Ian and daughter-in-law, Sam.


Gotta love a parade!!

****************************************


Beth Ullman

Good morning HoneyBee's and our devoted followers! As you know from June's post on Mon. we are doing characters today.......I chose Thomas the Train and scrapped pictures of my grandson with his first train.
I downloaded my image from the web, colored it with my Copics and used papers from Making Memories. The letters are stamped using Stampin'-Up stamps then embossed with my Cuttlebug. The border was made using Martha Stewart's fence punch.


Lucien was really into that train! I also have a close up of Thomas ~ or should I say Lucien, because I added his picture to the front of the engine below. Isn't he a cutie?


Well, that's it for me today. I hope you enjoyed my post.

*************************
Now it's your turn!! Show us your project featuring any character, whether it's a photo, Cricut cut, stickers, stamp, SVG file, etc. Post your link below, and you could be the winner of this week's prize of a Disney Princesses Cuttlebug Folder!!!


Photobucketand the HoneyBees