


Good Monday Morning!!!


Welcome to this week's Monday Motivational!! Today I am going to show you how to alter a photo using a software program. For my class, I am using Paint Shop Pro 8, but if you do not have this program, you may be able to get an idea of how to apply it to the one you do have. I have Photoshop Elements 3, but I am more comfortable with Paint Shop since I have been using that one for years. If you do not have a software program, you can still play along!!..At the end of my software demo, I'll give you ideas how you too can alter a photo!...So, let's get stated!! The first thing you want to do is open your program and get the photo you want to alter.
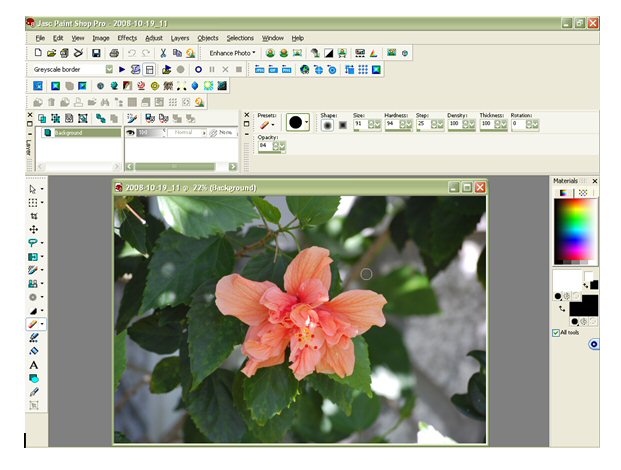 On the top toolbar, go to Windows and click Duplicate. You can now close the original photo since you will be working with the duplicate. This will allow you to retain the original and not lose it.
 Then go to Edit and click Paste. Choose 'Paste as new layer'
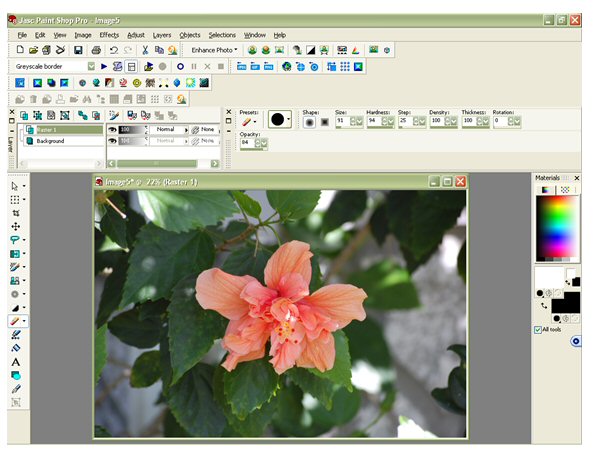 You can see in the layer box what you have and what you are working on. Make sure you still have the highlight on 'raster 1', then go to 'adjust' then 'hue/saturation/lightness'.

Set saturation to '0'. Click ok This is what you will get.


 As you get closer to the edges make smaller strokes or click your cursor in those tight ares so if you should go outside the area you want to change, you can hit the 'undo button' and start over in that area. I use the undo button quite often..lol It helps to have a steady hand which I don't have.
 Now all you need to do is save your photo until you are ready to print it out.

 Ok, so the eyes and eyebrows are a little scary, but you get the idea...lol..Ok, stop laughing...lol..
Acrylic paint was used for the edges, Copic for the hair and eyebrows and Atyou Spica glitter pens for eye and lips.
Here are some other examples of altering a photo
Sepia


 On the top toolbar, go to Windows and click Duplicate. You can now close the original photo since you will be working with the duplicate. This will allow you to retain the original and not lose it.
Now, go to Edit and click Copy
 Then go to Edit and click Paste. Choose 'Paste as new layer'
 You can see in the layer box what you have and what you are working on. Make sure you still have the highlight on 'raster 1', then go to 'adjust' then 'hue/saturation/lightness'.

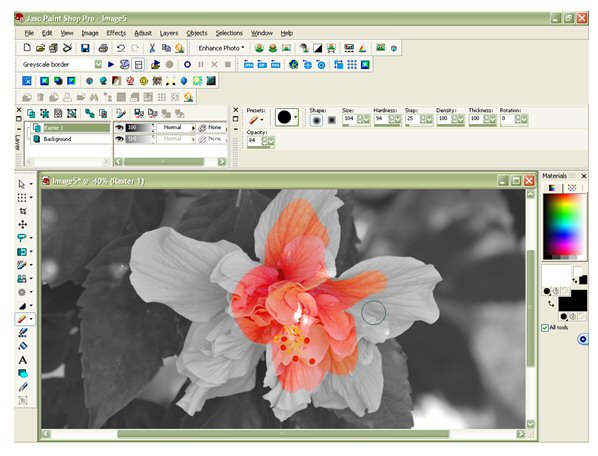
If you look at the layer box you will see I put my cursor over Background. This will show you what is under the top black and white photo.

By using my 'pan tool' (that is the little arrow on the side toolbar), you can enlarge your photo so it's easier to work with.
Then click on the 'eraser' and start erasing!
If you look at the center of the page toolbar, you can see where you can change the size of your 'eraser'. This will come in handy for the size of the area you are working on.
 As you get closer to the edges make smaller strokes or click your cursor in those tight ares so if you should go outside the area you want to change, you can hit the 'undo button' and start over in that area. I use the undo button quite often..lol It helps to have a steady hand which I don't have.
Here is the finished flower!!
 Now all you need to do is save your photo until you are ready to print it out.
 Please make sure that when you do a 'save as' you change the file extension. It will automatically come up for the software program, so use the drop down arrow and change it to JPEG-JFIF Compliant format.
If you have any questions, please don't hesitate to ask!!
Here is a layout I did using this altered method

Ok, now for those of you who do not have a software program, pull out those Copics!! You can use the Bic markers, but I find the softer tip on Copics work better. Print you photo in black/white and color in those areas you want to highlight!! I did have pens that were designed just for coloring on black/white; sorry can't remember who made those. I do remember though, they were pale and just gave a softer touch (look) to the photo.
Remember when paint was all the rage? I used a sponge brush with just a little paint to go around the edges of a photo. Simply do your brush strokes by pulling the paint from inside to the outside of the edges.

Acrylic paint was used for the edges, Copic for the hair and eyebrows and Atyou Spica glitter pens for eye and lips.
Here are some other examples of altering a photo
Sepia

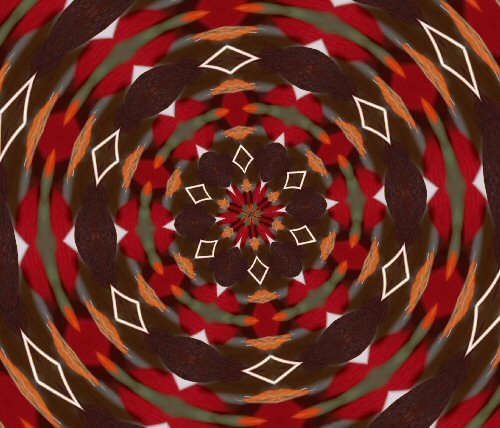
If your program has 'effects' you can really have some fun!
Original 

Kaleidoscope
An interesting technique for a layout is to cut up your photo in 3 pieces and pop the center piece! This works well for those cool landscape shots!
There are so many ways to alter a photo and I would love to see what you have to share!!

1 comments:
Glad you found your Verve stamps! Love the little love monkey and the way you incorporated fabric! Great job with the sketch, too! Thanks for playing!
A Boards
Post a Comment